- Главная
- Посуда Цептер
- Система очистки воды Цептер
- Цептер биоптрон (бионик)
- Cистема очистки воздуха Zepter
- Zepter Vacsy
- Zepter CleanSy
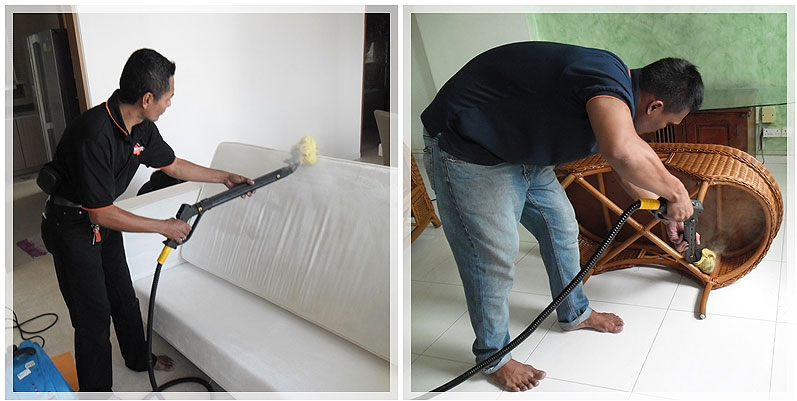
- Клинси — моет, чистит, дезинфицирует.
- Магнитный умягчитель воды Цептер (Zepter CleanSy Mag)
- Пароочиститель «Цептер» КЛИНСИ Серая линия
- Парогенератор Аква Джеббо от Цептер (ZEPTER Aqua Jebbo)
- Zepter SpyTel
- Фарфор Цептер
- Косметика и косметические приборы Цептер
- Медицинские приборы Цептер
- Часы
- Текстиль
- Контакты
НОВОСТИ
Только с 19 по 29 ноября 2013 года!
Комплект посуды для молодой семьи за 24343 руб. вместо 31924 руб…
Скидка 20% на всю посуду фирмы Цептер!
Предложение действует с 18 по 25 октября.
Отличная возможность…
Читать все новости
Клинси — моет, чистит, дезинфицирует.
Внимание!
О наличии товаров и ценах на товары узнавайте по телефону.
Среда нашего постоянного обитания — это наше жилище. И здесь мы в силах противостоять глобальным экологическим проблемам. Все виды загрязнений, выбрасывающиеся в атмосферу или поступающие в водоем — источник водоснабжения в вашем микрорегионе, находятся в той или иной концентрации и в нашем жилище.
 В первую очередь это относится к микробному загрязнению. Микрофлора жилого помещения включает в себя микрофлору предметов обихода, поверхностей, оборудования, одежды, игрушек, кухонных и столовых принадлежностей, пищевых продуктов, воздуха. Формирование микробного пейзажа происходит в результате проникновения микроорганизмов с потоками воздуха через двери или окна, а еще мы приносим с собой новых «обитателей» нашей квартиры на одежде и волосах, «братья наши меньшие» тоже немало участвуют в этом процессе…
Так как же существовать с этим сонмом микробов? Общий уровень микробного загрязнения зависит от личной санитарной культуры обитателей, и несоблюдение определенных правил гигиены ведет к созданию опасной для здоровья ситуации: к кишечным, инфекционным, легочным заболеваниям. И еще есть 10 тысяч видов микроскопических клещей, которые живут рядом с человеком и вызывают кож¬ные и аллергические заболевания!
Вряд ли кто-то «кварцует» свою квартиру. Что же мы имеем в арсенале средств борьбы за чистоту? Пылесос? Тряпка? Пожалуй, все! Даже неспециалисту ясно, что этого недостаточно, особенно в ситуациях, когда в доме есть животное или больной человек.
Тем не менее, теперь мы можем избавиться от всего этого, причем без дополнительных химических препаратов и без помощи специалистов, занимающихся дезинфекцией и дезинсекцией. Клинси — принципиально новый бытовой прибор для очистки и дезинфекции помещений. Клинси прост, как все гениальное: это — пароочиститель, работающий от электричества. Просто добавь воды!
Клинси прошел испытания в НИИ экологии человека и гигиены окружающей среды им.А.Н.Сысина РАМН. Было изучено действие пароочистителя на широкий спектр болезнетворных микробов. Заведующий лабораторией санитарной микробиологии, кандидат медицинских наук А. Е. Недачин считает, что прибор Клинси является экологически безопасным, недорогим и эффективным средством в отношении широкого спектра возбудителей инфекций бактериальной и вирусной этиологии.
Установлено, что использование прибора Клинси инактивирует золотистый стафилококк, сальмонеллу, кишечную палочку. В течение 15 секунд Клинси уничтожает пылевых клещей на коврах, подушках, матрацах и прочих материалах. За 20 секунд инактивирует всех возбудителей болезней на твердых поверхностях.
Особенно необходим Клинси, если кто-то из членов семьи болен туберкулезом, дизентерией, грибковыми заболеваниям, да и просто ангиной и гриппом. С помощью Клинси можно обрабатывать санузлы, одежду, посуду, постель, а также любые поверхности, устойчивые к действию пара — обои, дерево, ватин, линолеум, керамику. Для поддержания нейтральной микрофлоры достаточно обрабатывать квартиру раз в неделю,если в доме есть больной человек — чаще.
Пароочиститель отличается не только функциональностью, но и универсальностью, его можно использовать для увлажнения воздуха при чрезмерной сухости и для ароматизации.
Клинси прост и удобен. Необходимо только соблюдать общие правила безопасности при работе с бытовыми электроприборами. В стандартном комплекте имеются различные насадки: для очистки стекла, изогнутое сопло — для труднодоступных мест, три щетки разных цветов, чтобы не пользоваться одной и той же щеткой, к примеру, в ванной и на кухне. Можно приобрести и дополнительные насадки.
Этот полезный прибор может изменить наш быт, улучшит самочувствие, создавая ощущение комфорта, а главное — защитит ваше здоровье. То, что устройство подобного рода появилось на рынке бытовых приборов — неоспоримое достижение компании «Цептер».
Сопутствующие товары:
 Цептер Соковарка
 Кастрюля Цептер 5,3 л, 24 см
 Кастрюля Цептер 1,7л, 16см
 Цептер Кастрюля 14 л, 30 см
 Цептер Кастрюля 9 л, 24 см
 Кастрюля Цептер 4,5 л, 20 см
 Кастрюля Цептер 2,0 л, 16 см с 2 ручками
View a manual of the Zepter Tuttoluxo 6S cleanSy PWC-700 below. All manuals on ManualsCat.com can be viewed completely free of charge. By using the ‘Select a language’ button, you can choose the language of the manual you want to view.
Page: 1
B
D
C
G
H
K
L
M
I
J
A
F
E N
OPERATING INSTRUCTIONS
©
COPYRIGHT
HOME
ART
&
SALES
SERVICES
AG
—
ZEPTER
GROUP
—
PMD-HC-037-14-EN
—
Artwork:
BRID
MARKETING
—
ITALY
1 — OVERVIEW OF TUTTOLUXO 6S (PWC-700)
PWC-700
OPERATING INSTRUCTIONS — PWC-700
Downloaded from www.Manualslib.com manuals search engine
Page: 2
4
4.1 5 6
1 2 2.1 2.2
3 3.1 3.2 3.3
1
12*
2.3
7 7.1
7.2 8 9 10
2 3 4 5*
11*
2 — LIST OF ACCESSORIES AND FILTERS
7
8
9
2
3
4
5
6
1
FUNCTION
PANEL
MOTOR
PANEL
STEAM
CONTROL
TUBE
CARRIER
TUBE
CARRIER
FILTER SLOT
* Optional
WARRANTY CARD: TUTTOLUXO 6S (PWC-700)
DATE OF PURCHASE:
SERIAL NO.:
LOT NUMBER:
NAME AND ADDRESS OF PURCHASER:
FAULT/DEFECT:
STAMP AND SIGNATURE OF RETAILER:
AUTHORIZED SERVICE CENTRE NAME AND ADDRESS:
E-MAIL: TEL:
This warranty card has to be sent to the retailer or to the authorized service centre, together with the defective device and the receipt,
as proof of purchase.
Downloaded from www.Manualslib.com manuals search engine
Page: 3
EN 2
TUTTOLUXO 6S INDEX
1 OVERVIEW OF TUTTOLUXO 6S page 03
2 LIST OF ACCESSORIES page 03
3 LIST OF FUNCTIONS page 04
4 LIST OF FEATURES page 04
4.1 Patented features:
Spray SystemTM
, Slalom SystemTM
, Simply SystemTM
page 04
4.2 Safety features page 05
4.3 Technical data page 05
5 IMPORTANT SAFETY NOTICE page 06
6 GETTING STARTED page 07
6.1 Vacuum function page 09
6.2 Preparing the Boiler
(for steam cleaning, ironing & humidification) page 09
7 OPERATION page 10
7.1 Vacuuming — Wet & Dry with Water filter page 10
7.2 Steam Cleaning & Disinfection page 10
7.3 Steam Cleaning & Vacuuming at the same time page 10
7.4. Professional Steam Ironing page 11
7.5 Air Cleaning & Air Aroma Therapy page 12
7.6 Air Humidification page 12
8 USAGE OF ACCESSORIES AND FILTERS page 13
9 MAINTENANCE page 18
9.1 Filters page 18
9.2 Simply System TM
page 21
9.3 Cleaning of Flex Tube page 21
9.4 Descaling the boiler and electronic sensor page 21
10 WARRANTY STATEMENT page 23
11 DISPOSAL INFORMATION page 23
12 TROUBLESHOOTING page 24
13 USE OF ACCESSORIES — CHART page 25
WARRANTY CARD
Downloaded from www.Manualslib.com manuals search engine
Page: 4
EN 3
2 — LIST OF ACCESSORIES AND FILTERS
A Motor push button
B Carrying handle
C Steam control
D Function button
E Tank lid fasteners
F Tank lid
G Hose connection socket
ACCESSORIES
1 Extension tubes with rapid-lock
2 Carrier for accessories: Big Brush
2.1 Carpet accessory
2.2 Liquid accessory
2.3 Floor accessory
3 Carrier for accessories: Dress-fit single Jet
3.1 Small Nozzle
3.2 Wide Nozzle
3.3 Small round Brush
4 Carrier for accessories: Dress-fit triple Jet
4.1 Triangular Brush with single and triple steam jet
5 Round Brush with concentric head
6 Funnel for filling the boiler tank
7 Carrier for accessories
7.1 Liquid accessory with rubber squeegee
7.2 Solids accessory with bristles
8 Window Wiper
9 Iron Rest
10 Iron
11 Turbo Brush * optional
12 Vaporizer *optional
FILTERS
1 Floater Filter
2 Air Intake Filter
3 Polyester Filter
4 Motor Intake Filter
5 Hepa Filter *optional
1 — OVERVIEW OF TUTTOLUXO 6S
H Hose power connection
I Polyester filter
J Cable winding
K Flaps of the water tank open
L Water bucket, internal view
M Bottom view with Sensor Cap
N SLALOM SYSTEMTM
Downloaded from www.Manualslib.com manuals search engine
Page: 5
EN 4
1 2
1
2
3
4
5
6
2 3 5 6
3 — LIST OF FUNCTIONS
1. Vacuuming — Wet & Dry with Water filter
2. Steam Cleaning & Disinfection
5. Air Cleaning & Air Aroma Therapy
6. Air Humidification
3. Steam Cleaning & Vacuuming at the same time
4. Professional Steam Ironing
4 — LIST OF FEATURES
SLALOM SYSTEMTM
Insert the hose with its connection into the SLALOM SYSTEM™ socket at the
front and push the plug into the socket (Pict. 1). An audible alarm will tell you
that the hose has been connected up to the power.
The extraordinary patented design of TUTTOLUXO 6S makes the machine
surprisingly easy to handle. The small front wheels and the hose connection
both swivel to allow you maximum freedom of movement and also prevent
the hose from wearing out. There is no need to pull it, as is usually done with
conventional vacuum cleaners, to drag the machine forward (Pict. 2).
Several features make yourTUTTOLUXO 6S your special agent in the war against
dirt and grime. TUTTOLUXO 6S can be moved around swiftly, effortlessly and
efficiently and is so safe to handle at the same time.
4.1PATENTEDFEATURES:
SPRAYSYSTEMTM
,SLALOMSYSTEMTM
, SIMPLY SYSTEMTM
TUTTOLUXO 6S is equipped with the exclusive SPRAY SYSTEMTM
,
a sophisticated system of filtration through highly efficient nebulized water
(cloud like) which captures even the finest particles by binding these to the
water particles which then by gravity fall into the container.
Moreover, it offers an intelligent and environmentally aware 4-level filtering
system: no more paper filters to buy separately and then dispose of. As well as
saving on running costs, TUTTOLUXO 6S saves you time, as you do not have to
go and buy any chemicals or dust bags, and produces less waste.
Nebulization Purified air
Trapped dirt
The exclusive Spray SystemTM
uses a process called “nebulization”, part of a
four-level filter system, to capture even the smallest dust particles.
➊ TUTTOLUXO 6S vacuums any kind of dust and dirt. ➋ Deep inside the
TUTTOLUXO 6S water is sprayed in a micro-sized mist that instantly bonds to dirt
and dust particles, creating the uniqueWater Filter and removing them from the
air, and ➌ sucking them into the water tank. ➍ — ➎ The 4-level filter system traps
the remaining smallest particles. ➏ The air that comes out is clean, fresh, and
breathable – totally purified!
Downloaded from www.Manualslib.com manuals search engine
Page: 6
EN 5
2
1
4
3
SIMPLY SYSTEMTM
See Chapter 9 — Maintenance
4.2 SAFETY FEATURES
4.2.1. Mechanical safety features:
• The safety pressure valve exit is placed on the bottom of the machine.
so that steam, in case of overpressure, comes out underneath the device
with no harm to persons. The working pressure in the boiler is 4.5 Bar and
the safety valve must open within a range of maximum +2 Bar. The valve
must allow for more steam to exit from the valve than the boiler can create
so that pressure decreases.
• 2 INCOLOY 800 heat coils, extremely resistant against high temperatures
and against limestone deposits.
• Intake and outtake air for the vacuum motor are kept in separate directions
in order to keep the motor cooled.
4.2.2. Electric safety features:
• The boiler has a pressure sensor which guarantees that the pressure is
always around 4.5 Bar.
• It has a multi pin construction and by just inserting the plug, which has a
special sequence, the electricity will pass on to the commands
on to the hose, to the iron or any other electric accessory.
• If the sequence is correct, a resistor in the commands responds within a
very small tolerance range that our accessory is connected to; no foreign
accessory or object will be recognized.
• If these criteria are met, approximately 7 seconds pass (delay) prior to
freeing the electric circuit.
4.3 TECHNICAL DATA
Data plate characteristics
WARNING! Make sure the technical data on the data plate matches that of
your electricity mains.
Technical characteristics
• Voltage: 230 V +/- 6% 50 Hz
• Boiler power: 2100 W (1050+1050)W
• Motor vacuum power: 1200W higher technology gives same power as
a 1600 W motor but: quieter, lower vibrations, lower energy consumption,
higher reliability and higher air volume.
• Iron power: 850 W
• Steam pressure: (450 kPa) 4.5 bar
• Steam flow: 55 g/min
• Max. steam temperature in the boiler: 148°C
• Effective Air flow: 23.51 l/sec
• Vacuum pressure: 2290 mm H2
O (~ 22.4 kPa)
• Time of heating: 2 min. approx after turning on the steam power, just a few
seconds with refill
• Boiler volume: 0.8 litres
• Boiler capacity: 0.4 litres
• Recovery tank volume: 1.2 litres
• Length of flexible tube: 2.0 m
• Working reach: 8 m
• Length of power lead: 5 m
• Working noise: 71 db(A)
Safety features:
• Service pressure switch: 2 ± 6 bar 0.3+/-0.15
•
Safety thermostat: 170 °C
• Boiler safety valve: 6 bar +/- 0.5
• Low voltage handle commands:5 Volt
•
Safety float
• Heat insulation in extension tubes
• Steam safety lock
Patented systems:
• Spray SystemTM
• Slalom SystemTM
• Simply SystemTM
Product code: PWC-700B
• Weight: 9,7 kg
• Size: 336x332x479 mm
Safety heat insulation extension tubes:
separate tubes for 1 steam and 2 vacuuming,
3 outer tube protects from burning and
isolates the electric part 4.
Downloaded from www.Manualslib.com manuals search engine
Page: 7
EN 6
5 — IMPORTANT SAFETY NOTICE
The manual uses specifications to draw your attention to some details:
CAUTION! For safety reasons, be careful.
WARNING! It contains additional information and useful advice for the
appropriate use of the appliance.
1. This user’s manual is an integral part of the appliance. Read carefully all
the instructions and safety notices contained in the present manual as
they give important information on the machine use and maintenance.
Keep the manual for future reference.
2. This appliance provides for the use of water and steam:
follow thoroughly all instructions contained in the present manual.
3. After removing the packing, make sure the machine is intact,
carefully inspecting the vacuum cleaner body and the accessories pack.
4. If you do not understand information, do not use the appliance and refer
to professionally Zepter qualified personnel.
5. Before connecting the appliance to the mains, make sure the data on
the data plate match those of your electricity mains. The electrical data
plate is located on the bottom of the appliance .
6. If your mains socket is not compatible with the machine plug, have
the plug replaced with a suitable one by Zepter qualified personnel.
They should also check that the mains socket is suitable for the amount of
power required by the appliance.
7. The use of adaptors, multiple sockets and/or extensions is generally to be
avoided; if you cannot do without them, make sure that only standard or
multiple adaptors and extensions are used which conform to current safety
regulations.
8. Do not use the appliance if any damage is shown on the power cord or the
plug. In case of malfunctioning, switch off, without trying to repair it.
For any repairs refer only to your Zepter Repair Centre.
9. Should the appliance fall or overturn, switch off immediately and
disconnect from the mains. Wait a second, put the device back into its
working position and after a few more seconds turn it on again.
Never turn the machine over when there is water in the tank: the water
could get into electrical parts.
10. In case of emergency disconnect the device from the mains.
11. This appliance can only be assigned to the functions it has been
designed for, i.e. house cleaning and air enhancement.
The maker cannot be held responsible for any damage deriving from
improper, incorrect or unreasonable use.
12. Do not use the appliance in the presence of explosives, highly flammable
materials, gas or naked flames.
13. Never obstruct the air outlet located at the back of the machine. Before use,
make sure the opening is not clogged up with dirt, limescale, dry leaves
etc. Get rid of any dirt deposit as described in chapter 9, Maintenance.
14. This appliance can be used by children aged from 8 years and above and
persons with reduced physical, sensory or mental capabilities or lack
of experience and knowledge under supervision or if they have been
instructed about how to use the appliance safely and about the hazards
involved. Children shall not play with the appliance. Cleaning and
maintenance shall not be performed by children without supervision.
15. Do not use accessories which are not provided by the maker, as they
could cause serious danger.
16. Only use the appliance in its horizontal position, with all four wheels
resting on the floor.
17. The power cord must be completely unwound before use. Do not
damage the cord by squashing it, stepping on it, pulling it, knotting it or
by touching it with hot or sharp objects.
18. Disconnect from the mains when the appliance is not being used.
19. Be very careful not to come in contact with the appliance’s hot surface or
steam during use.
20. Never vacuum, for any reason whatsoever, toxic, or highly flammable
substances, explosives, building rubble, embers or lit cigarettes. Do not use
the appliance to clean the chimney or the uptake and/or vacuum building
ruble and/or to remove oily substances (such a soot).
21. Never aim the jet of steam at persons or animals, electrical installations,
asbestos containing materials or toxic and hazardous materials.
22. Do not use steam to clean the appliance itself when it is working, or to clean
clothes or shoes when they are being worn.
23. Stop steam delivery when replacing accessories.
24. Never pull the power cord to unplug the machine from the mains socket.
Downloaded from www.Manualslib.com manuals search engine
Page: 8
EN 7
1 2
Maintenance:
• Always follow the instructions and keep your appliance in good working
condition.
• RepairsmustbeperformedonlybyaZepterServiceCentreandinaccordance
to national and local safety regulations. Unauthorised repairs could cause
injury or machine damage. The manufacturer cannot be held responsible for
unauthorised work.
Disposal:
• At the end of its lifecycle, we recommend making the machine safe by
cutting off the power cord. Do so only after unplugging it from the mains!
Do not dispose of the machine as ordinary rubbish, but leave it with
personnel, qualified to collect such material. In this way it will be properly
disposed of and recycled. This is a valuable aid for safeguarding our
environment!
• Save these instructions for future reference!
25. Do not expose the machine to severe weather elements, such as:
rain, hail, snow, wind, etc…
26. Use the appliance with the utmost care when children are nearby.
27. Do not use the power cord to lift the appliance or to drag
it about while you are cleaning!
28. If you decide to no longer use the appliance, we recommend making it
safe by cutting the power cord, after unplugging it from the mains!
We also recommend not treating it as ordinary rubbish, but to deliver
it into the hands of personnel qualified to collect such material. In this
way it will be properly disposed of, but most of all it will be possible to
recycle components, and reuse them to make other objects, safeguarding
the environment, which belongs to all of us.
29. The iron must be used and rested on a stable surface.
30. When placing the iron on its stand, make sure that the surface on which
the stand is placed is stable.
31. The iron is not to be used if it has been dropped, if there are visible
signs of damage or if it is leaking.
6 — GETTING STARTED
IMPORTANT! The first time the appliance is to be used following this
operation.
WARNING!
Make sure the power cord is not plugged in before you start any operation.
Lay the appliance on the floor and open the tank lid as shown in Pict.1 and 2.
WARNING!
For safety reasons, never vacuum, for any reason, toxic or highly flammable
substances, explosives, embers or lit up cigarettes, detergents, or foam of any
kind. Do not use the appliance to clean the chimney or the uptake or to remove
oily substances. This could lead to serious danger and to a possible machine
breakdown!
CAUTION!
Before you turn on the machine, for sucking up solids open the flaps (Pict. 1
and 2), remove the top of the bucket (Pict. 3overleaf) and fill it with 0.7 litres of
cold water, paying attention that the level corresponds to the mark printed on
the separator (Pict. 4 overleaf). The tank can be removed for filling, if required
(Pict. 5 overleaf).
Take off the boiler tank cap and fill the tank with about 0.9 litres water (Pict. 6
overleaf). Close the tank lid and refasten it. Now you can connect the appliance
to the mains.
Downloaded from www.Manualslib.com manuals search engine
Page: 9
EN 8
5 6
3 4
9 10
7 8
Water level
Hose and accessories fitting
Insert the hose with its connection into the SLALOM SYSTEMTM
socket at the
front and push the plug into the socket. (See Chapter 4.1: Patented Features,
Slalom SystemTM
).
In order to clean floors, it will be necessary to insert the proper accessories onto
the special extension tube (Pict.7) by using the proper fit/release button (Pict. 
and then connect to the grip handle by simply pressing.
Having seen how to connect the accessories (they are all connected in the same
way), you can now start with your cleaning.
When the hose and plug are inserted, the green steady light will come on, to
signal that the machine is connected to the mains.
The tank lid fasteners have been designed in such a way that, should they be
hit when they are open, they will not be damaged. They might break loose, but
it is very easy to put them back into place, by fitting the forks onto the support
pins (Pict. 9).
For your convenience you will find 2 TUBE-CARRIERS on each side of the device
in which you can insert the extension tubes so they can stand free whenever you
need your hands free for something else (refill the boiler-tank, move furniture
around, etc.), (Pict. 10).
Downloaded from www.Manualslib.com manuals search engine
Page: 10
EN 9
11
12
12
6.1 VACUUM FUNCTION
Once you have inserted the hose, as previously described, to start the vacuum
function press the motor push button (A), the orange light will come on to
signal that the motor is set on medium speed ( Pict. 11).To start the motor, press
the speed button (Pict. 12) on the hose grip handle. To change motor speed,
press the button and keep it pressed until you feel the speed change, and then
release.
To switch off the motor, press and then quickly release the button. water level
steam
connection
speed button
steam power button
6.2 PREPARING THE BOILER (FOR STEAM CLEANING,
DISINFECTION, IRONING & HUMIDIFICATION)
In order to use steam it is necessary to press the steam function button, and so
switch on the boiler (Pict.11).
WARNING! Should the red light come up, signalling the boiler is out of
water, fill the tank with a little water (see Pict. 6), then press the button
twice — once to disable and twice to re-enable the function.
The steam orange light will start flashing, to signal that the boiler is building up
pressure. As the right pressure is reached, the flashing orange light becomes
steady, and steam is ready to be delivered.
Now insert the desired cleaning accessory directly into the hose grip handle or
with one or more extension tubes in between. To deliver steam, just push the
steam power button on the handle (Pict. 12).
In order to avoid involuntary steam out-put, lock the steam lever by pushing the
STEAM SAFETY LOCK towards the «Closed» position.
steam safety lock
Downloaded from www.Manualslib.com manuals search engine
Page: 11
EN 10
1
7.1 VACUUMING — WET & DRY WITH WATER FILTER
Please only vacuum liquids such as water and spilled beverages. Always clean
afterwards according to instructions below.
WARNING! To vacuum up liquids, you do not have to fill the water tank
with clean water! If large amounts of water are to be vacuumed, you
should use medium speed and maximum speed for small amounts, never
minimum. The appliance can suck-up up to 1.2 litres of liquid. In excess
of this quantity, the safety float is enabled making a noise and the motor
noise becomes more acute. At this point, turn the vacuum function off
immediately and empty the water bucket.
Fill the water tank as described in chapter 6. Carry on with your cleaning
operations, choosing the best accessory for the job, see chapter 8.
Tohavemaximumvacuumpower,selectvacuumpoweronthegrip(Pict.1).Ifyou
are vacuuming dust or other kinds of dirt, replace the tank water frequently.
If you only want to vacuum dust, refill the water tank in any case as described
in chapter 6.
Vacuuming
Follow the instructions above and then choose the accessory best indicated for
what it is you want to do. Turn on and choose the desired speed. Use the lowest
speed for delicate materials and medium or high speed for most other jobs, just
as required.
Vacuuming liquids only
If you want to vacuum liquids, such as spilled water, no need to add water first,
but you can start vacuuming directly. For best results do the following:
Medium speed — large amounts of localised liquids (e.g. a siphon).
High speed — small amounts of liquids.
7 — OPERATION
7.2 STEAM CLEANING & DISINFECTION
As the right pressure is reached, the flashing orange light becomes steady, and
steamisreadytobedelivered.Nowinsertthedesiredcleaningaccessorydirectly
into the hose grip handle or with one or more extension tubes in between. To
deliver steam, just pull the steam power button on the handle (Pict. 1). In order
to get the best steam output, start with the steam regulator at minimum (-),
then slowly turn up (towards +) until you reach the perfect steam-pressure for
your work. For further instructions see chapter 8 USAGE OF ACCESSORIES
7.3 STEAM CLEANING & VACUUMING AT THE SAME TIME
When operating the two functions together it is important that you FIRST heat
up the boiler and do some steam cleaning in order to heat up the Flex Tube,
the Extension tubes and the accessory you are using. Only when the device is
fully heated up should the vacuum-function be added to the steam function.
steam power button
steam safety lock
speed button
Downloaded from www.Manualslib.com manuals search engine
Page: 12
EN 11
B
D
C
A
E
2
3
7.4 PROFESSIONAL STEAM IRONING
WARNING!
When first using the iron, you may notice that some water mixed with
steam is released from the hotplate. It is advisable therefore not to direct
the first jet of steam at the fabric to be ironed. Act on the iron temperature
adjustment (D-Pict.2) to set the temperature. Adjust the amount of steam
delivered on the steam control. Press the button on the iron handle to
control the output of steam. The red light on the functions button will turn
on when there is no water.
WARNING!
Note:
The iron soleplates can pick up color from natural fibers and will become
darker over time. It will not affect functionality of the iron.
Some parts of the iron reach very high temperatures.
Do not touch. Danger of burning.
Replace the iron on its Iron Rest (E) after use.
Never leave the iron when it is connected to the appliance.
An iron can be connected to the appliance for professional ironing, taking also
advantage of the continuous refill facility! Connect the appliance up to the
electrical power and insert the iron plug on the machine body. Activate the
ironing function: press first the motor push button (A) and after a short buzzer,
the iron is ready. Deactivate the ironing function: when you have terminated
ironing, before disconnecting the iron plug from the machine body, press the
motor push button (A).
Separate the clothes to be ironed according to fabric type, and in accordance
with the temperature specified on the care label. First iron the clothes that
require the lowest temperatures.
Steam ironing
If you wish to use steam, press the function button to raise steam; note that the
flashing orange light comes on and becomes steady when the boiler is ready.
When steam ironing, always set the temperature selector to steam. The steam
position is in the area marked, between the positions and . In this
temperature band, you can steam iron all fabrics. Advice: the ironing symbols
specified on clothing labels refer only to dry ironing, and are therefore not valid
in case of steam ironing. We recommend testing ironing of very delicate fabrics
on a part of the clothing that is hidden, or alternatively covering the item of
clothing with a cloth.
Description of iron
A. Steam button
B. Monotube
C. Iron temperature light
D. Iron temperature adjustment (Pict. 3)
E. Iron rest
Dry iron
There is no need to use the steam button for dry ironing.
Set the temperature adjustment on the iron (D) to the desired temperature, and
wait for the light (C) to go out. You can then begin dry ironing.
Note: Always iron synthetics on a dry setting.
Suggested temperature per fabric
synthetic fibres (minimum temperature)
silk/wool (medium temperature)
cotton/linen (maximum temperature)
Downloaded from www.Manualslib.com manuals search engine
Page: 13
EN 12
4 5
8
7
6
7.5 AIR CLEANING & AIR AROMA THERAPY
The quality of the air we breathe is certainly one of the most important factors
affecting our health and well-being. With TUTTOLUXO 6S it is possible to add
essential or balsamic oils to the water in the purification tank. This will allow
an intense Aroma therapy or Balsam therapy treatment, much to the delight
of everyone.
Add a few drops of ZEPTER COSMETICS AROMA LIQUID to the water in the
water tank when vacuum cleaning. In this way you can enjoy the fragrance and
invigoration of aroma therapy while working and for many hours afterward.
Aroma therapy:
• Open the tank lid and take out the purification tank.
• CAUTION! Make sure the tank is clean.
• Refill the tank with clean water, as described in chapter 6,
adding 1 litre of water.
• Add to the water a few drops of appropriate concentrated fragrance (Pict. 4).
We strongly recommend using Zepter Cosmetics Aroma Liquid only.
Damage can be caused to the plastic parts by use of inappropriate oils.
• Reassemble the purification tank and the lid.
• Plug in. Switch on the appliance at medium speed, by pressing the
motor button once.
• Pure and perfumed air will come out of the grille at the back, quickly
refreshing all rooms in the house, and getting rid of stuffiness and bad
odours. ( Pict. 5).
7.6 AIR HUMIDIFICATION
Prepare theTUTTOLUXO 6S as for steam cleaning (see chapter 6.2.), put the steam
regulator knob at low level, switch the device on, press the steam lever and give
the air a refreshing steam-bath. To be used with flex-tube (Pict. 6) or optional
accessory:VAPORIZER KIT (Pict. 7).
TUTTOLUXO 6S is the only vacuum
cleaner working also as a humidifier & air
refresher! Use the patented VAPORIZER
to humidify the air you breathe and fill it
with fragrances for your well-being.
You don’t have to do anything to
vaporize, TUTTOLUXO 6S keeps working
while you are relaxing.
VAPORIZER KIT optional: PWC-710B. (Pict. 8).
CAUTION! Make sure the tank is clean,
filled with a bit of clean water.
Downloaded from www.Manualslib.com manuals search engine
Page: 14
EN 13
2 2.1
1
2.2
a b c
2.3 2.1
8 — USAGE OF ACCESSORIES AND FILTERS
1. EXTENSION TUBES
Two tubes with rapid lock system for choosing desired length.
They are thermally insulated to protect against scalding. Max lenght 2.4 m.
2. Carrier for accessories: BIG BRUSH
Reliable and robust, it is suitable for any kind of floor. This multipurpose brush is
supplied with other accessories for best cleaning results on every kind of floor:
2.1 Carpet accessory without bristles (Steam or Vacuum)
2.2 Liquid accessory (Steam or Vacuum)
2.3 Floor accessory with bristles (Vacuum only)
The choice to use steam only, vacuum only or both, depends on the accessory
being used and what you are cleaning: with stubborn dirt (2.1 & 2.2), it is advisable
to use steam and afterwards vacuum; to go over quickly or to dry, vacuum will do
(2.1,2.2 & 2.3). The brush is equipped with four handy grippers to attach a cloth. It
also has a slider for locking the joint. The swivel joint allows for easy use even in
tight spaces (e.g. underneath furniture).
USEFUL TIPS
How to use the Carpet Accessory 2.1
The vacuum performance is excellent in every situation, even along walls
or in corners, due to its lateral intakes. You may vacuum or steam clean
(use both together on smaller surfaces without heavy dirt). Do not use on
very delicate floors such as parquet in order to avoid scratching unless
you attach a cloth. Use it with a cloth fixed to the 4 grippers to wipe any
smooth floor using steam and then vacuum. Always do one piece at a time,
first passing with low steam to loosen and trap the dirt in the cloth and
afterwards pass again quickly with the vacuum. This will leave the surface
clean and dry. Rinse your cloth as you need and continue.
How to use the Liquid Accessory 2.2
Quickly clean up spills and puddles from the floor, safely and efficiently.
Always pay attention whether your float pops up when vacuuming up large
amounts. You can also use this accessory on tiles and non delicate floors
to first steam a patch of floor, also using the maximum steam output, and
then vacuuming up (don’t steam while vacuuming except on small and
almost clean surfaces, because most of the steam is sucked up before it can
penetrate the dirt or kill micro-organisms).
Downloaded from www.Manualslib.com manuals search engine
Page: 15
EN 14
2.2
2.3
Use the rear bristles on the brush itself to soften and remove heavy dirt and
grime if necessary.
Attention
• Parquet and other delicate floor surfaces
When steam cleaning on parquet, minimise the steam quantity in order
not to cause damage. Work on a small area in order to see how the parquet
reacts to steam cleaning and do not place the brush directly on the wooden
surface but kept at a distance. See how the wood reacts. There are many
different types of parquet and each may react differently. If you have no
negative reaction from the parquet to the steam then you may slowly start
working with the brush on the floor and slowly add more steam, always
keeping in mind that the parquet may not show negative sign of reaction
to the steam right away.
If you find very resistant dirt, always work the localised area with steam in
order to soften the dirt through the heat and moisture of the steam until it
can simply be removed.
Give the dirt time in order to soften or liquefy prior to removal. After having
followed these steps you can now easily vacuum up the dirt by tilting
the brush back to the parallel position.
Attention — Parquet and other delicate floor surfaces
If used on parquet, use low steam, patch wise and then vacuum up, much
the way you would clean a window. Works well on floors with light dirt.
Avoid using the rear bristles on delicate surfaces.
How to use the Floor accessory with bristles 2.3
Use it for vacuuming all delicate surfaces such as parquet where you wish to
avoid scratches from the rougher profile of the Carpet Accessory 2.1.
Gets into every corner and along the walls, loosening dust and dirt with its
bristles before vacuuming up. Use it on tiles to remove dust and light dirt.
Always use delicately and without any liquid on the floor so that the bristles
stay clean and do not wear down quickly. Do not use to scrub.
Attention – never attempt to use this accessory with steam!
GENERAL USE
Very dirty surfaces
Brush the surface in order to remove most of the dirt, then give steam to
dissolve it, and stop the steam. Lastly, turn on the vacuum and go over the
surface by tilting the brush forward, drying and vacuuming the dirt.
Medium dirty surfaces
Operate with both steam and vacuum (depending, however, on the accessory
being used; device must be very well heated up to deliver perfect steam),
then turn off the steam. The brush must always be tilted forward (to facilitate
vacuuming). After finishing work, do not stop the vacuum immediately, to allow
the dirty water still inside the tube and hose to reach the recovery tank. Tilt the
brush face up to avoid any dripping.
Carpets and rugs
Attention – always vacuum your carpet or rug as well as possible before
using steam, this will avoid any dirt getting moist and sinking deeper into the
carpet. The appliance can clean and disinfect any kind of carpet or rug with
the exception of long-haired rugs, these will tend to close the water jets and
lead to bad filtration. With rugs made of sheep’s wool please test on a small
section before steam cleaning the whole rug, the heat may cause a change
of colour in the wool or lead to shrinking. Steam cleaning will revive colours,
restore the original thickness and eliminate impurities from the carpet bottom
layer. If your carpets and rugs are dusty on top, start by using the big brush
Downloaded from www.Manualslib.com manuals search engine
Page: 16
EN 15
3 3.1
3.2 3.3
2.4
3. Carrier for accessories: DRESS-FIT SINGLE JET
3.1 Small nozzle (also fits on Dress-fit triple jet 4)
3.2 Wide nozzle (also fits on Dress-fit triple jet 4)
3.3 Small round brush
This accessory can be used on its own or equipped on top with a small round
brush (place it on the nozzle and push until it holds) to remove grease, or with
vacuum nozzles, to allow grease or dust to be sucked in when using vacuum
only. Use Small Nozzle (3.1) for a specific area and Wide Nozzle (3.2) for a
wider area. It is particularly recommended to clean and to remove grease:
• between tiles
• inside and outside ovens and cookers
• steel or enamel sinks
• wash basin, bidet, toilet, shower, bath
• taps and fittings (to remove scale)
Suitable for all difficult work.
First brush with steam the area where grease is to be removed.
Stop the steam and switch to vacuum with the nozzle.
For dusting radiators: use steam, the dust will fall on the floor and you can then
vacuum everything off.
For doors/windows frames: place a cloth on the edge of the frame and tilt the
dress-fit while operating steam; the cloth will gather the dirt.
For cleaning the toilet: use steam on the edge where water descends from, to
remove scale. If necessary, use the small round brush.
with vacuum only. After vacuuming, use the appliance with simultaneous
action (steam+vacuum), according to the same procedure recommended
for medium dirty surfaces. With particularly stubborn and crusty stains, we
recommend the use of 1 hole dress-fit (3) + large nozzle (3.2).
WARNING! Steam ensures a good cleaning in any case, however, to pre-
treat carpets or rugs with detergents, be careful not to vacuum off any foam
produced as it could end up inside the motor! It is advisable to use low
foam detergents.
Adding a cloth
CAUTION! Fixing a cloth on the brush is recommended when you go over
delicate materials with steam: fabric, but also delicate surfaces like parquet or
marble, when you want to dissolve and spread wax (steam on low and delicate
cloth that won’t scratch). (Pict. 2.4).
Downloaded from www.Manualslib.com manuals search engine
Page: 17
EN 16
7 7.1 7.2
8
4 4.1
5
6
7. Carrier for accessories: To be used in conjunction with:
7.1 Liquid accessory with squeegee
7.2 Solids accessory with bristles
7.1 Liquid accessory with squeegee
For spilled liquids, cleaning glass surfaces of all kinds with steam as well as all
level surfaces which are heat resistant. Excellent in the kitchen on the tops, on
stainless steel, tiles.
7.2 Solids accessory with bristles
Suitable for cleaning armchairs, sofas, coats or vacuuming dust off uneven
surfaces. If used with steam, pass a cloth afterwards since the vacuum will
probably not suck up all moisture. Very good for cleaning in the car.
8. WINDOW WIPER
The window wiper is for easy cleaning of glass and other smooth surfaces.
WARNING! In winter, pre-heat the windowpanes using steam, at a 5 or 10
cm distance, before proceeding with any cleaning operation.
Operate the two functions, steam and vacuum, at the same time by slightly
tilting the window cleaner and moving down the window edges.
4. Carrier for accessories: DRESS-FIT TRIPLE JET
This accessory (4) combined with a special triangular brush, is particularly
suitable for cleaning the oven and worktops, thanks to its shape and size.
4.1 Triangular brush
Combined with the Carrier for accessoires Dress Fit Triple Jet, this special brush
can reach difficult and awkward places and do a thorough job. By turning it
both ways you can have a central or side/angled steam jet!
5. ROUND BRUSH
This brush should be used when you just want to vacuum.
6. FUNNEL
This is a useful accessory for refilling the boiler with water through the refill tank.
Downloaded from www.Manualslib.com manuals search engine
Page: 18
EN 17
9
10
11
12
3
1 2
4
9. IRON REST
Safety support to place the iron on.
10. IRON
See chapter 7.4.
(PROFESSIONAL STEAM IRONING )
11. TURBO BRUSH *OPTIONAL
CODE: PWC-700-6
It is provided with a suction unit and a
rotating carpet sweeper brush, operated
by the same suction air. Turbo Brush is a
carpet sweeper that is able to completely
vacuum dust as well as pet hairs and other
fibres from all kinds of floors.
12. VAPORIZER *OPTIONAL
CODE: PWC-710B
TUTTOLUXO 6S is the only vacuum
cleaner working also as a humidifier & air
refresher! Use the patented VAPORIZER
to humidify the air you breathe and fill it
with fragrances for your well-being. You
don’t have to do anything to vaporize,
TUTTOLUXO 6S keeps working while you
are relaxing.
1. FLOATER FILTER
This filter traps the bigger dirt (e.g. leaves)
which is not caught by the rainstorm of
the Spray SystemTM
and is therefore an
important gate-keeper and protector for
the Air Intake Filter. (Pict.1 and 2).
3. POLYESTER FILTER
For those requiring a greater filtering
capacity, the manufacturer has equipped
TUTTOLUXO 6S with a washable polyester
filter. This filter is additionally reducing
considerably the “noise pollution” from
vacuuming. In order to keep the filter
always clean and ready for maximum
performance, it should be inspected
monthly. The Polyester filter at the rear
air-outlet is designed to trap particles as
small as 0.3 micron, catching anything that
escaped the previous filter-levels.
The Polyester filter, mainly used for noise-
reduction makes the TUTTOLUXO 6S one of
the most silent appliances in its class, in the
world (Pict.4).
2. AIR INTAKE FILTER
A function you can find in all TUTTOLUXO
models, designed to prevent particles from
carpets, dust or dirt present in the air from
reaching and damaging the motor (Pict.3).
Downloaded from www.Manualslib.com manuals search engine
Page: 19
EN 18
1
2
5
6
4. MOTOR INTAKE FILTER:
Designed to prevent various particles
(from carpets, dust or dirt present in
the air) from reaching the motor. It is
also used to filter the motor cooling air, a
unique function to be found only with all
TUTTOLUXO models (Pict. 5).
5. HEPA FILTER *optional
CODE: PWC-700-516
High Efficiency Particulate Air.
The HEPA filter technology assures
maximum efficiency of 99.97% particle
capture even smaller than 0.3 microns.
The HEPA filter also helps to eliminate
micro-organisms in indoor air. (Pict. 6).
9 — MAINTENANCE
After periods of intense use (check at least once every six months) it is necessary
to check the efficiency of all filtering elements. The appliance outer surfaces
can be cleaned with a cloth soaked in neutral detergent. Should the appliance
fall or overturn, switch off immediately and disconnect from the mains. If
the machine gets in contact with water, dry it with a dry cloth and wait a few
minutes before switching on again. Do not put away the appliance whilst the
tank still contains dirty water, as this may cause bad smells from mould and
encrustations forming inside the tank.
Do not direct jets of water or high pressure steam at the appliance (even
when disconnected from the mains) to clean it! Do not use high pressure
cleaning machines!
IMPORTANT! Before carrying out any type of maintenance, turn the
machine off and disconnect from the mains.
9.1 FILTERS
The following filters should be replaced immediately if you notice any
damage to them! Contact your Zepter Service Centre for new filters.
FLOATER FILTER
This filter traps the bigger dirt (e.g. leaves)
which is not kept by the rainstorm of
the Spray SystemTM
and is therefore an
important gate-keeper and protector for
the next filter, the Air Intake Filter. (Pict. 3).
Check the efficiency of filter.
To do this, remove the filter with the
help of the float (Pict. 2), by pushing it up
against the filter. Wash the filter element
with plenty of cold water and neutral
detergent.
Do not leave the filter to dry on heaters
or radiators! Allow the filter to dry naturally
(not on radiators or heaters).
Downloaded from www.Manualslib.com manuals search engine
Page: 20
EN 19
5
4
3
Donotusetheapplianceuntilthefilterisperfectlydry.Useofadampfilter
coulddamagethe appliance. As soon as stains or mould appear on the filters
surface, replace them with new ones, to be found at a Zepter Service Centre.
The life of this particular component is strongly influenced by how much the
appliance is actually being used.
AIR INTAKE FILTER
This prevents particles that have not been fully filtered by the SPRAY SYSTEMTM
and the floater filter from reaching the motor. Check the efficiency of filter
when you are cleaning the purification tank.
To do this, remove and rinse repeatedly the filter, separating it from the
cover and the machine body (Pict.3) with the help of a small pliers (eyebrow
tweezers will do). Wash the filter element with plenty of cold water and neutral
detergent. Do not leave the filter to dry on heaters or radiators!
As soon as stains or mould appear on the filters surface, replace them with
new ones, to be found at a Zepter Service Centre. The life of this particular
component is strongly influenced by how much the appliance is actually
being used.
POLYESTER FILTER
In order to keep the filter always clean and ready for maximum performance, it
should be inspected monthly.
To inspect the filter, proceed in the following way:
1) Remove the exhuast filter cover, at the back of the TUTTOLUXO 6S (Pict. 4).
The polyester filter is fitted inside. Lay the exhuast
filter cover, on the floor and extract the filter as shown (Pict. 5).
2) Check the filter state; if there are traces of dust or dirt, wash with plenty of
warm water and neutral detergent to remove.
3) Allow the filter to dry naturally (not on radiators or heaters).
Do not use the appliance until the filter is perfectly dry. Use of a damp
filter could damage the appliance.
4) After cleaning, put the filter back into place and reassemble the cover,
making sure to properly fit the exhuast filter cover hooks
onto the slits on the appliance body. Once the filter cover is in place,
rotate it upwards for the final fixing with the stopping tongue.
After long periods of use, should the polyester filter be torn or damaged, it
should be replaced with a new one from the authorised Zepter Service Centres.
Downloaded from www.Manualslib.com manuals search engine
Page: 21
EN 20
10
8
6
7
9
MOTOR INTAKE FILTER
Designed to prevent various particles (from carpets, dust or dirt present
in the air) from reaching the motor. It is also used to filter the motor cooling
air, a function to be found in TUTTOLUXO models.
1. Check that the aspirating filter is clean, and
therefore efficient, at least once a month, if you
use the vacuum cleaner daily.
2. If needed, remove and rinse the aspirating
filter frequently. To remove it, it is necessary to
first take off the tank and so avoid that, on
turning the appliance over, water is spilled
on the motor fan. Find the lower cover and
remove it by undoing the central screw, simply
using your hands or a coin.
Remove the filter (Pict. 6-7-8) and wash it with
water and neutral detergent.
Before using the vacuum cleaner again, it is
important that the filters are dry, so that they can
operate at their best.
Do not leave the motor intake filter to dry on
heaters or radiators!
HEPA FILTER * OPTIONAL
High Efficiency Particulate Air
The HEPA filter technology assures maximum efficiency of 99.97% particle
capture even smaller than 0.3 microns. The HEPA filter also helps to eliminate
micro-organisms in indoor air. (Pict. 9).
In order to keep the filter always clean and ready for maximum performance, it
should be inspected monthly.
TANK LID WITH FLOAT
Also check efficacy of the Safety Float located on the tank lid. If encrusted with
dirt or mould, this may not function correctly (Pict. 10). Check that the float can
move freely within its cage. Rinse the lid with plenty of hot water and neutral
detergent.
To inspect the filter, proceed as for replacing the Polyester Filter
1) Remove the grilled cover on the back of the TUTTOLUXO 6S.
The HEPA filter is fitted inside. Place the grilled cover on the floor and
extract the filter as shown.
2) Check the filter state; if there are traces of dust or dirt, replace it.
3) Put the new HEPA filter into place and reassemble the cover,
making sure to properly fit the grilled cover hooks onto the slits on the
appliance body. Once the grilled cover is in place, rotate it upwards for the
final fixing with the stopping tongue.
After some periods of use, should the HEPA filter be torn or damaged, it should
be replaced with a new one from a Zepter Service Centre.
Downloaded from www.Manualslib.com manuals search engine
Page: 22
EN 21
13
11 12
14 15
REPLACEMENT OF FILTERS:
Floater Filter (PWC-700-4): Replace yearly or earlier according to condition.
Air Intake Filter (PWC-700-2): Replace yearly or earlier according to condition.
Polyester Filter (PWC-700-501): Replace yearly or earlier according to condition.
Motor Intake Filter (PWC-700-533): Replace yearly or earlier according to
condition.
Hepa Filter (PWC-700-516): Replace every 6-12 months.
Low noise filter (PWC-700-518): Replace yearly or earlier according to condition.
9.2 SIMPLY SYSTEMTM
No need to store up on bags or filters thanks to the SIMPLY SYSTEMTM
.
Cleaning the purification tank is all that is required for top TUTTOLUXO 6S
efficiency. At the end of your work, empty the liquid waste of the purification
tank as shown in Pict. 11 .
To make this operation easier, the divider inside the tank can be taken off
(Pict. 12) and it is also advisable to remove the nebulizers (Pict. 13). Rinse tank,
divider and nebulizers with abundant hot water and neutral detergent until all
residues and stains on the tank walls have been removed.
WARNING!
Whenyoutakeoffthedivider,makesurethatitisputbackcorrectlyintotheproper
guides with its curved side facing forwards and upwards and that it touches the
bottom (otherwise it won’t slide in). Please be careful, these are delicate pieces.
In case one gets broken or lost, immediately ask for a spare part from your Zepter
Service Centre. Do not use the TUTTOLUXO 6S without it. Allow all pieces to dry
or dry them yourself before replacing them in the machine and closing the cover.
Moisture left inside could create mildew and unpleasant odours.
9.3 CLEANING OF FLEX TUBE:
In order to avoid the arise of smelly mold and deposit inside the flex tube, it
is recommended, once terminated the cleaning, to proceed with the rinsing
hose acting as follows: remove all contents inside the recovery tank, immerse
the hose in a container of clean water (preferably warm) and, with vacuum
regulator on third speed, aspirate about a liter of water.
Repeat two or three times, remembering to empty each time the contents of
the recovery tank.
9.4 DESCALING THE BOILER AND ELECTRONIC SENSOR
Here we will show you how to extend considerably your machine’s
working life thanks to an exclusive technology that allows to prevent
limescale formation in the steam boiler.
After prolonged periods of activity, limescale deposits make no longer
usable the boilers of most steam appliances found on the market.
Your TUTTOLUXO 6S, thanks to an exclusive patented technology, allows to
inspect and clean the special electronic sensor that monitors the boiler water
level.
WARNING!
We strongly advise, after aspirating liquids or solids, to rinse the water bucket
inside and any accessory used, by emptying the tank and aspirating 1 litre
of clean tap water, repeat this twice. Also, please do not leave any aspirated
liquid inside the tank, to prevent the formation of limescale or moulds, and
consequently bad odours.
Downloaded from www.Manualslib.com manuals search engine
Page: 23
EN 22
17
16
• Unscrew the electronic sensor by turning the knob anticlockwise, as
shown in Pict. 15.
• Use the specific funnel (6) to pour approximately half a glass of white
wine vinegar (approx. 0.1 litres) into the boiler. Fasten the sensor to the
boiler entrance by turning clockwise. Tighten without forcing.
• Return the appliance to its original position, and replace the tank. Close
the tank lid and refasten it, Pict. 1-6. Chapter 6.
• Connect the appliance to the mains and turn on as usual.
• Turn the boiler on by pressing the function button.
Wait approximately 1 minute, then turn the appliance off. Leave to work
for approximately 12 hours, remembering to shake the machine
a little every now and then, to let the descaling solution work better.
• Once the stated time has passed, unscrew the electronic sensor by
turning the knob anticlockwise (Pict. 15), take hold of the machine and
empty out the boiler using a basin or other such receptacle (Pict. 17).
For a more thorough cleaning of the electronic sensor, we advise you to use a
glass of white vinegar, or a mixture of water (70%) and descaler (30%).
Never use concentrated, undiluted descaling products!
You could chemically damage the sensor’s surface! Leave the product or
the vinegar to act on the sensor for at least 2 hours Pict. 16.
Fasten the sensor back onto the machine, by turning clockwise.
Tighten without forcing.
IMPORTANT! The first time the appliance is to be used following this
operation, remember to discharge a little steam onto a dirty cloth. Repeat this
several times, in order to empty the steam circuit of all descaling product.
The appliance is now ready for use once again!
Other machines, because of limescale deposits, can no longer detect water
levels; your TUTTOLUXO 6S however, thanks to a simple operation you can
carry out at home, can be as new. You will also be able to descale the boiler,
further prolonging the appliance efficiency.
We advise you to carry out this operation at least once a year, although the
amount of limescale forming in the boiler is very much dependent on the
hardness of your mains water. In any case, if you see a deterioration in your
machine steam functions performance, or limescale coming out of the steam
accessories, that means it’s time to descale sensor and boiler.
WARNING!
We advise you against using water with hardness exceeding 30°f (French
degrees).
Proceed as follows: finish off cleaning and wait for the machine to cool down
completely.
WARNING!
Never, for any reason, carry out your descaling operations when
the machine is still hot! Risk of burns! Wait at least two hours before
proceeding with any maintenance operation.
• Disconnect the plug from the mains.
• Remove the hose from the appliance, to make operations easier.
• Remove the tank lid and purification tank and empty completely.
• Carefully turn the machine upside down, identifying the sensor knob
(Pict. 14).
Downloaded from www.Manualslib.com manuals search engine
Page: 24
EN 23
This appliance can only be assigned to the functions it has been designed for,
i.e.housecleaningandairenhancement. Themakercannotbeheldresponsible
for any damage deriving from improper, incorrect or unreasonable use.
All our appliances have undergone strict inspection tests and are guaranteed
against manufacturing defects. The guarantee starts from the date of purchase.
The date of purchase is the date shown on the invoice issued by the dealer upon
the delivery of the appliance.
The manufacturer undertakes to repair or replace cost-free within the guarantee
period those parts that prove to have manufacturing defects.Those defects that
are not clearly attributable to either the material or the manufacturing will be
examined at one of our Technical Service Centres or at our headquarters and
charged according to the outcome.
The Warranty is only valid if:
1. The machine shows material or product defects.
2. No signs of breaking by the customer or the presence of no original pieces
fit by other people had been found.
3. Original accessories had been used.
4. The machine has not been overloaded or crashed.
The Warranty does not include:
1. The parts which can normally wear out.
2. The damages caused by transport, inadequate use, negligence, incorrect
installation and use, not in conformity with the warning listed in the
machine catalogue.
3. Consumables (1. Floater Filter, 2. Air Intake Filter, 3. Polyester Filter,
4. Motor Intake Filter, 5. Hepa Filter).
This guarantee does not affect the consumer’s statutory rights under applicable
national legislation in force, nor the consumer’s rights against the retailer arising
from the sales/purchase agreement.
In the absence of applicable national legislation, this guarantee will be
consumer’s sole and exclusive legal remedy, and the manufacturer shall not be
liable for any incidental or consequential damages for breach of any express
of implied guarantee of this product. The liability of manufacturer is limited
to and shall not exceed the purchase price of the product actually paid by the
consumer.
This guarantee covers no damage to the product resulting from abuse or misuse
of the product, inappropriate packaging, accidents, maintenance and repairs
done by unauthorised centres.
If, after the purchase of the product, its label with the serial number has been
removed or is not recognisable, the manufacturer reserves the right to refuse
the guarantee service.
10 — WARRANTY STATEMENT
In accordance with art. 13 of Legislative Decree no. 151 dated 25 July 2005, the
implementation of European Directives 2002/95/EC, 2002/96/EC and 2003/108/
EC on the reduced use of hazardous substances in electrical and electronic
equipment, and their disposal, the barred bin symbol means that at the end of
its useful life the product must be disposed of separately from ordinary waste.
At the end of its useful life, therefore, the user must dispose of the appliance at
11 — DISPOSAL INFORMATION
the specific differentiated waste collection centres for electronic
and electro-technical waste, or alternatively give it to the retailer
to dispose of appropriately upon purchasing a new equivalent
appliance, under the one-for-one rule.
Downloaded from www.Manualslib.com manuals search engine
Page: 25
EN 24
TROUBLE CAUSE SOLUTION
After connecting the machine to the power outlet
the LED for low water level starts flashing and an
acoustic signal is heard.
The water level in the tank is low.
Unplug the machine.
Fill up the water tank and plug it in again.
The steam ready LED is on but no steam comes out.
The hose is not completely connected.
Check the hose is correctly fitted to the
appliance.
The steam regulator is completely closed. Open the steam regulator.
While working, an accessory detaches itself. The accessory is not correctly connected. Check that the accessory is correctly connected.
Vacuum power is too low or performance goes
down while working with the vacuum.
A filter is dirty blocking intake. Check and clean filter.
The filters are not properly mounted. Check filter and if necessary reposition.
Air is coming in where it should not.
Check that the cover, hose and accessories are
correctly mounted and fastened.
The seal along the water bucket is not properly
positioned.
Reposition correctly the seal between the bucket
and cover.
The hose or an accessory is obstructed by dirt. Check and free the passageway.
The pivoting front wheel passage is obstructed. Check and free the passageway.
The motor works correctly but vacuum
performance is poor. The floater is closing the air passage.
Empty the water bucket and fill up to minimum
level with clean water.
The hose or accessories smell unpleasant.
Dirt and grime has accumulated in the hose,
accessories or bucket.
Clean all parts with clean water and if necessary
light detergent, but make sure to clean and dry
after each use.
12 — TROUBLESHOOTING
Downloaded from www.Manualslib.com manuals search engine
Page: 26
EN 25
✔ ✔ ✔
✔ ✔
✔ ✔
✔ ✔ ✔
✔ ✔
✔ ✔ ✔
✔ ✔
✔ ✔ ✔
✔ ✔
✔
✔
✔
✔
✔
✔ ✔
✔
✔ ✔
✔
✔ ✔
✔
✔
✔ ✔
✔ ✔
✔
✔ ✔ ✔
✔ ✔
✔
✔ ✔
✔ ✔
✔ ✔
✔ ✔
✔ ✔
✔
✔
✔
✔
✔
✔ ✔
✔ ✔
✔
✔
✔
✔
✔
✔
✔
✔
✔
✔
✔
✔
✔
✔
✔
✔
✔
✔
✔
✔
✔ ✔
✔
✔
✔
✔ ✔ ✔
✔ ✔
2 2.1 2.2 2.3 3.1 3.2 3.3 4 4.1 5 7.1 7.2 8
3 7 11
✔
✔
✔
✔
✔
✔
✔
✔
✔
✔
✔
13 — USE OF ACCESSORIES — CHART
ACCESSORIES
2 Carrier for accessories: Big Brush
2.1 Carpet accessory
2.2 Liquid accessory
2.3 Floor accessory
3 Carrier for accessories: Dress-fit single Jet
3.1 Small Nozzle
3.2 Wide Nozzle
3.3 Small round Brush
4 Carrier for accessories: Dress-fit triple Jet
4.1 Triangular Brush with single and triple steam jet
5 Round Brush with concentric head
7 Carrier for accessories
7.1 Liquid accessory with rubber squeegee
7.2 Solids accessory with bristles
8 Window Wiper
11 Turbo Brush * optional
MARBLE/
STONE
FLOOR
CARPET
PARQUET
RUGS
TILED
FLOORS
TILE
GROUT
SINK/
TOILET
BATH
OVENS/
COOKERS
RADIATORS/
STEEL
TAPS
KITCHEN
WORKTOP
LINOLEUM
ARMCHAIRS
SOFAS
CAR
WINDOWS
Downloaded from www.Manualslib.com manuals search engine
Бытовые средства для очистки имеют большую популярность среди современных домохозяек. Но не все имеют понятие, как пользоваться ручным пароочистителем и электрическим. Возможно, поэтому многие и не рискуют покупать такую вещь. Но на самом деле пользоваться пароочистителем не так уж и сложно. Нужно всего лишь привыкнуть к нему. В этой статье подробно разбирается ответ на вопрос о том, как правильно пользоваться пароочистителем.
Как это работает?
Для начала разберем устройство данной техники. Это конструкция, в которую входят:
- Нагревающий ТЭН.
- Спусковое устройство для выпускания струи пара.
- Емкость для воды.
- Трубка для вывода пара, которая имеет различные насадки.
После запуска вода в емкости быстро разогревается до 140 градусов Цельсия и превращается в пар. Затем можно нажать на спусковой курок. Далее пар очищает то, что находится под струей. Также следует отметить, что существуют разного типа насадки. Эти насадки иногда бывают в комплекте, а чаще всего покупаются отдельно. Но они стоят не очень дорого, а купить можно их в любом магазине бытовой техники.
Как пользоваться пароочистителем для дома?
В этом нет ничего сложного. Достаточно знать несколько моментов:
- Как разобрать и собрать пароочиститель (и пользоваться насадками). Важно правильно выбрать насадку для каждого отдельного предмета.
- Как наполнить резервуар водой.
- Как включить аппарат.


Итак, пошаговая инструкция:
- Необходимо снять крышку с поверхности. Для того чтобы снять ее, нужно только лишь нажать на клапан сверху и крутить против часовой стрелки.
- Вместе с прибором имеется также и резервуар для воды. Он является мерным прибором. Нужно просто наполнить его водой.
- Поставить крышку обратно и крутить против часовой стрелки до упора. Важно, чтобы крышка была крепко закрыта.
- Установить насадку (подробнее о выборе и предназначении насадок будет рассказываться далее).
- Подключить аппарат к электричеству, ждать, пока загорится свет и погаснет. Это будет сигналом к тому, что он готов к использованию.
- Направить прибор к поверхности для очистки и нажать на стартовую кнопку.
- Желательно не держать прибор слишком близко к предмету, чтобы не испортить его.
- Не надо пугаться, если во время процесса загорится свет и не будет выходить пар на тот момент. Это может означать перегрев устройства или нехватку воды в приборе.
- Для того чтобы наполнять воду во время процесса работы, необходимо отсоединить устройство от источника питания.
- Перед тем как снять крышку прибора, следует один раз нажать на курок подачи пара, чтобы сбросить остаточное давление.
- Нельзя сразу же открывать крышку. Можно ее слегка приоткрыть и оставить, чтобы прибор остыл. А через несколько минут можно открыть крышку целиком и долить туда воды.
- Вода может быть как холодной, так и горячей. Какую лучше использовать? Данный аппарат очень быстро прогревает воду, поэтому нет смысла специально греть ее.
Чистка прибора
Хотя прибор этот предназначен не для грязных работ, но все же очищать его нужно после каждого раза использования.
Как это делать:
- Обязательно отсоединить прибор от розетки.
- Нажать на кнопку старта один раз.
- Приоткрыть крышку прибора и оставить на пять минут для остывания.
- Если еще осталось вода внутри, то ее следует вылить.
- Очистить прибор влажной, а затем сухой тканью. Очищать нужно мягкой тканью, которая не оставляет следов ниток.
- Затем нужно закрутить крышку обратно.
- Все насадки можно мыть под водой, а после этого высушить сухой тряпкой.
Что им можно чистить?
Этот прибор сам по себе очень универсален. Он может чистить практически все поверхности, за исключением тех, что чувствительны к влаге. Например, это дерево или тонкие ткани. Он может чистить такие поверхности, как:
- Стены ванной комнаты.
- Сантехника.
- Кухня с ее бытовыми приборами.
- Санузел.
- Шторы.
- Ковры.
- Пол из кафеля или ламината.
- Мягкая мебель.
- Одежда.
- Листья домашних растений.
Также преимущество пароочистителя в том, что им можно чистить даже самые труднодоступные уголки дома. Данным устройством можно полностью очистить комнату от грязи и пыли.
Насадки для каждого случая
Главную роль в работе с пароочистителем играют насадки. Они упрощают работу с прибором и делают его более эффективным. Если к прибору не прилагаются насадки, то их можно купить в ближайшем магазине техники. Но какие выбирать насадки? Каждая идет для отдельного случая.
Ванная комната
Конусные насадки лучше всего подходят для ванной комнаты. Жесткие щетки используются не всегда. Они подходят только для жестких поверхностей. Эти насадки ни в коем случае нельзя применять для мягких поверхностей, чтобы избежать порчи вещей.
Также здесь идеально подойдет насадка-сопло, которая помогает чистить даже самые труднодоступные уголки. Она подходит для чистки щелей на кафеле.
Мягкая мебель
Треугольная насадка с мягким ворсом очень подходит для чистки ковролина и мягкой мебели. Но лучше всего перед нанесением пара пропылесосить поверхность, а потом уже обработать пароочистителем. Тогда покрытие будет максимально очищено от грязи. Предварительно пропылесосив вещь, нам будет легче работать с очистителем. Последний не придется так долго держать на одном месте, чтобы избавиться от какого-либо пятна.
Стекла
Существует специальная насадка для чистки стекол, ее цель – не навредить стеклам. Ведь при высоких температурах они могут треснуть. Поэтому нужно обращаться осторожно, чтобы не слишком приближать прибор к стеклу.
Полы
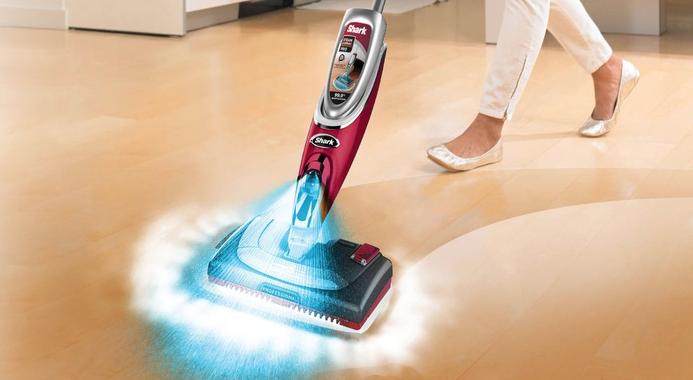
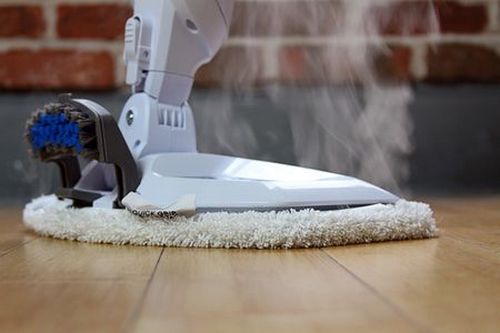
Паровая швабра отлично справляется со своим предназначением. Она может очистить не только паркет и ламинат, но даже линолеум. К данной насадке также прилагается специальный тканевый чехол, который следует надевать на него во время работы.
Несмотря на боязнь испортить деревянные поверхности, многие утверждают, что на самом деле даже дерево не портится при высоких температурах пароочистителя.
Ручной пароочиститель
Данный прибор приемлем по цене и невелик в своих размерах. Данный пароочиститель для дома удобен:
- Для мытья окон.
- Очистки зеркал.
- Удаления свежих пятен.
- Увлажнения домашних растений.
Пользоваться им следует так же, как и обычным пароочистителем.
Очиститель «Клинси» и особенности его использования
Существует огромное множество моделей, но какая из них лучше? Пароочиститель «Клинси» (как пользоваться данным аппаратом, расскажем далее) не только очищает, но при этом дезинфицирует поверхность. Достаточно всего лишь налить воды — и можно ипользоваться.
Воздействие «Клинси» на окружаемую среду было испытано и проверено в лабораторных условиях. Оказалось, что данный прибор является экологически безопасным и эффективным средством в борьбе с различными инфекциями и бактериями.
Удивительно, что всего на протяжении пятнадцати секунд он уничтожает пылевых клещей. А двадцати секунд ему хватает на то, чтобы дезактивировать возбудителя болезни на различных поверхностях. Скорее всего, у многих возник вопрос, как пользоваться пароочистителем «Клинси». Данный прибор следует использовать так же, как и было описано ранее. То есть необходимо:
- Открыть крышку.
- Налить воды.
- Закрыть ее.
- Подключить к электричеству.
- Запустить стартовый курок.
- При добавлении воды отключать от электричества.
- Не забыть помыть и высушить в конце работы.
Итак, для того чтобы в полной мере ощутить практичность пароочистителей для дома, нужно всего лишь понять, как ими пользоваться, и следовать инструкции, которая описана выше.
Operating Instructions Manual for Zepter Tuttoluxo 6S cleanSy PWC-700 Vacuum Cleaner (26 pages)
Specifications:1172/1172855-tuttoluxo_6s_cleansy_pwc700.pdf file (06 Jun 2023) |
Accompanying Data:
Zepter Tuttoluxo 6S cleanSy PWC-700 Vacuum Cleaner PDF Operating Instructions Manual (Updated: Tuesday 6th of June 2023 11:24:11 PM)
Rating: 4.7 (rated by 32 users)
Compatible devices: SC4520, TUTTOLUXO 2S, 2177 Series, WD12500, PRETTY, XL2090RHM, Work-Shed Vac WVG-951, TW411.
Recommended Documentation:
Text Version of Operating Instructions Manual
(Ocr-Read Summary of Contents of some pages of the Zepter Tuttoluxo 6S cleanSy PWC-700 Document (Main Content), UPD: 06 June 2023)
-
8, Zepter Tuttoluxo 6S cleanSy PWC-700 EN 7 1 2 Maintenance: • Always follow the instructions and keep your appliance in good working condition. • Repairs must be performed only by a Zepter Service Centre and in accordance to national and local safety regulations. Unauthorised repairs could cause injury or machine damage. The manuf…
-
13, EN 12 4 5 8 7 6 7.5 AIR CLEANING & AIR AROMA THERAPY The quality of the air we breathe is certainly one of the most important factors affecting our health and well-being. With TUTTOLUXO 6S it is possible to add essential or balsamic oils to the water in the purification tank. This will allow an intense Aroma…
-
1, B D C G H K L M I J AF E N OPERATING INSTRUCTIONS © COPYRIGHT HOME ART & SALES SERVICES AG — ZEPTER GROUP — PM D — H C- 037-14 — E N — Artwork: BRID MARKETING — ITALY 1 — OVERVIEW OF TUTTOLUXO 6S (PWC-700) PWC-700 OPERATING INSTRUCTIONS — PWC-700
… -
3, Zepter Tuttoluxo 6S cleanSy PWC-700 EN 2 TUTTOLUXO 6S INDEX 1 OVERVIEW OF TUTTOLUXO 6S page 03 2 LIST OF ACCESSORIES page 03 3 LIST OF FUNCTIONS page 04 4 LIST OF FEATURES page 04 4.1 Patented features: Spray System TM , Slalom System TM , Simply System TM page 04 4.2 Safety features page 05 4.3 Technical data page 05 5…
-
25, Zepter Tuttoluxo 6S cleanSy PWC-700 EN 24 TROUBLE CAUSE SOLUTION After connecting the machine to the power outlet the LED for low water level starts flashing and an acoustic signal is heard. The water level in the tank is low. Unplug the machine. Fill up the water tank and plug it in again. The steam ready LED is on but no steam comes out. T…
-
18, EN 17 9 10 11 12 3 1 2 4 9. IRON REST Safety support to place the iron on. 10. IRON See chapter 7.4. (PROFESSIONAL STEAM IRONING ) 11. TURBO BRUSH *OPTIONAL CODE: PWC-700-6 It is provided with a suction unit and a rotating carpet sweeper brush, operated by the same suction air. Turbo Brush is a carpet …
-
2, 4 4.1 5 6 1 2 2.1 2.2 3 3.1 3.2 3.3 1 12* 2.3 7 7.1 7.2 8 9 10 2 3 4 5* 11* 2 — LIST OF ACCESSORIES AND FILTERS 7 8 9 2 3 4 5 6 1 FUNCTION PANEL MOTOR PANEL STEAM CONTROL TUBE CARRIER TUBE CARRIER FILTER SLOT * Optional WARRANTY CARD: TUTTOLUXO 6S (PWC-700) DATE OF PURCHASE: SERIAL NO.: LOT NUMBER: NAME …
-
12, EN 11 B D C A E 2 3 7.4 PROFESSIONAL STEAM IRONING WARNING! When first using the iron, you may notice that some water mixed with steam is released from the hotplate. It is advisable therefore not to direct the first jet of steam at the fabric to be ironed. Act on the iron temperature adjustment (D-Pict.2…
-
Zepter Tuttoluxo 6S cleanSy PWC-700 User Manual
-
Zepter Tuttoluxo 6S cleanSy PWC-700 User Guide
-
Zepter Tuttoluxo 6S cleanSy PWC-700 PDF Manual
-
Zepter Tuttoluxo 6S cleanSy PWC-700 Owner’s Manuals
Recommended: M-PGDL Series, XL45, W610i


-
Koolatron 322203
DIRECTIONSFOR USEBV01HAND-HELD ELECTRONIC SPIDER & INSECT TRAPONE YEAR LIMITED WARRANTYSAVE THIS PART OF THE LIMITED WARRANTY✁Your manufacturer’s limited warranty is now effective. Please mail this card to Koolatron.Date:Item#:Purchased from: ❑ Retail Store ❑ Mail Order ❑ Other:Retailer� …
322203 3
-
Taurus Exeo Compact
CatalàEXEO COMPACTAspiradorAspiradorVacuum cleanerAspirateurStaubsaugerAspirapolvereAspiradorStofzuigerOdkurzaczΗλεκτρική σκούπαПылесос с пылесборникомAspiratorПрахосмукачка …
Exeo Compact 64
-
Milwaukee AS 250 ECP
Original instructionsOriginalbetriebsanleitungNotice originaleIstruzioni originaliManual originalOorspronkelijke gebruiksaanwijzingOriginal brugsanvisningOriginal bruksanvisningBruksanvisning i originalAlkuperäiset ohjeetΠρωτότυπο οδηγιών χρήσηςOrijinal işletme talimatıPůvodn …
AS 250 ECP 35
-
Siemens VS08G
sVS08G….Instructions for useNotice d’utilisationGebruiksaanwijzingIstruzioni per l’usoInstrucciones de usoBrugsanvisningBruksanvisningBruksanvisningKäyttöohjeInstruções de utilizaçãoenfrnlitesdanosvfiptDownloaded From Vacuum-Manual.com Manuals …
VS08G 164
Operating Impressions, Questions and Answers: