
OPENBOXx-800
Please read this User’s Manual carefully.The menu structure and specification can be changed without notice.

4
Safety … .. . ……. o
General lntroduction …………..4
Glossary
Remote Control Unit….. ……….6
Receiver Connection ……..9
View Mode ……… l0
1 . Channel lnfo Banner …………. I 02. To change channel in View mode. ………….,. l03. Channel list…….. …………………………….. i t
4. Volume control …………. 11
5. Satellite List .. ……. j 1
6. Favorite Channel list …. ………… 127. Changing mode. ……….».12B. Useful function ………….. iS9. Program guide mode …… 19

1.2 Data Base Upgrade
1.3 lnitialize STB . ……24
2. Channel Manager ……..20
2.1 Channel Edit . …………..202.2 Favorite Group …..,……..21
3. System setting ………….223.1 Language Settino ……………..223.2 Video Settings …»»23
3.3 Modulator Settinss ………..».233.4 Clock Settinss ………243.5 Lock Settings ……….243.6 System lnformation …..».25
4. Utility ………..26
5. Conditional Access …….27
Trouble Shooting ……..28
Specification……. ……….29
10

This receiver has breen manufactured to satisfy the lniernational safety standards.Please read the following safety precautions carefully.
MAIN SUPPLY
: 1 101240V, 50/60H2. 25W
OVERLOADING
: Do not overload a wall outlet, exiension cord or adapter as this may result in
fire or electric shock.
LIQUIDS
: This receiver shall not be exposed to dripping or splashing and that no objectsfilled with liquids, such as vases, shall be placed on the receiver.
CLEANING
: Disconnect the receiver from the main supply before cleaning. Do not use anykind of solvents to clean the receiver, only use a soft,dry cloth.
VENTILATION
: The slots on top of the receiver must be left uncovered to allow proper airflow’ to the unit.
Do not stand the receiver on soft furnishings or carpets.
Do not expose the receiver to direct sunlight or do not place it neai a heater.
Do not stack electronic equipments on top of the receiver.
ATTACHMENTS
: Do not use any unrecommended attachments as these may cause hazard ordamage the receiver.
CONNECTION TO THE SATTLITT DISH LNB
: Disconnect the receiver from the main supply belore connecling or
disconnecting the cable from the satellite dish.
FAILURE TO DO SO CAN DAMAGE THE LNB.
CONNECTION TO THT TV.
: Disconnect the receiver from the main supply before connecting or
disconnecting the cable from TV.
FAITURE TO DO SO CAN DAMAGE THE TV.
EARTHING
: The LNB cable MUST BE EARTHED to the system earth {or the satellite dish.
LOCATION
: Place the receiver indoor in order not to expose to lightening, rain or sunlight.

This manual will help you learn basic functions such as formatting, selecting
channels and many other functlons of the receiver. All functions can be performed
from the remote control, and some from the Front panel. You can easily install it by
selecting «service Searching» f unction and upgrade its software through
communication cable or satellite.
The remote control is designed for easy access to all the functions at once and for
comfortable grab for your hand. lt is programmed to control all functions and to easily
watch telecommunication programs via the receiver.
This receiver is designed for your convenient use and you can upgrade software at
anytime.

*1 Antenna
A device that collects and radiates electromagnetic waves.lncludes a satellite dish and a broadband antenna.
*1 Forward Error Correction (FEC)
A system of error control for data transmission.
l* Frequency
The number of cycles or events per one second, which is expressed in the unitof Hertz(Hz).
*l lntermediate Frequency (lF)
A frequency to which a carrier frequency is shifted as an intermediate step intransmission or reception.
*t Low Noise Block (LNB) DownconverterA low noise microwave amplifier and converter which downconverts a range offrequencies to lF range.
$* Packet ldentifier (ptD)
A set of numbers that identifies transport stream packets containing data froma single data stream.
*1 Polarization
characteristic of an electromagnetic wave determined by the orientation ofthe electric field vector.
* Quaternary Phase Shift Keying (OPSK)
Phase-shift keying in which four different phase angres are used.
*1 Transponder
Equipment in a satellite which receives a single uplink channel from a satelliteEarth station, amplifies it, converts the frequency and changes the polarization,then rebroadcasts it back to Earth.
*l Transport StreamThe bit stream formed prior to transmission of signals by combining the video,audio and data streams of one service. lt consists of fixed length packets of1 88 bytes of data.

ML.}TE
Numeric Buttons
oc
ec
s@
ooo
sIso
STANOEY
TV/SAI
TV/N
ep0
VOL */*FAV
MFNU
EXIT
rcXT$LEEP
ZOOM
PAUSE
otgoooo0o
SAr U$T l!
Cl’l/Fage Up,Down
INFO
cHa, *l-,1?
Left{, Fight}
BACK
$UBT
AUPIO
OPTION
PAUIITSC
-6-

Q srnruoav
Switches between Operationand Standby modes.
@ oelouReserved for future use
Changes PAL or NTSC TV mode.
Switches between TV and Radio modes
Changes to channel mode without savingthe changed inf ormation of the menumode
@ rvlsnr
@ uurrTurns sound on or of{.
@ snr lrsrSelects favorite channel list or .rrr»[email protected]
turns
Selects TV or Satellite mode. @ enl/rursc
Electronic Program Guide button dis-plays the TV/Radio program guide.
up/down volume
Moves to main menu during TV viewins.
@ rvln
@ eec
@ P.s. Up/Down
@ urruu
@ exrr
@ rexr
@ ancx @ slren
@ zoolit
@ suer @ enuse
Select the subtitle language f orcurrent service
@ nuoroChanges audio mode to left+left,Right+right, and stereo
@ Numer ic ButtonsChanges channels or selects themenu options.
channel list in the view mode.
Changes the page of channel lists.
I NFO
Displays the program informationbox on the screen.
@ rnvFavorite Channel list.
Load the teletext service for current
@ Channel Up/Down
Changes channels or items fromtop to bottom on the menu
Chanoes Left. Rioht menu
prevtous stepthe changed
Selects sleep time and on/off
Selects 2X. 4X zoom function.
Pause or continue current picture.
@ t-ett/Riorrt
Moves back to theWithout savinginf ormation.

O Front Panel
f . O : Turn on & off the power of the receiver.
2. MENU : Moves to main menu during TV viewing -3. OK: Displays the channel list and selects the item on the menu.4. CHA, CHv : Changes channels or items from top to bottom on the menus
5. VOL , VOLv : Turns up/down volume.
O Rear Panel
O lF INPUT : Use to connect a LNBiSatellite Dish.
e lF OUTPUT : Use it when connecting to another receiver.
O ANT lN : Use to connect a terrestrial antenna or cable TV signal.
O TV OUT : Use to connect a RF signal from this receiver to RF(ANT) input jack on TV.
O 0/12V : DC 12V Voltage output
@ VIDEO/AUDIO OUTPUT : Video/Audio signal from your receiver to VCR, TV, or to an
external audio equipment
a TV SCART : For the video/audio input of the TV.
@ VCR SCART : For the video/audio input/output of the VCR.
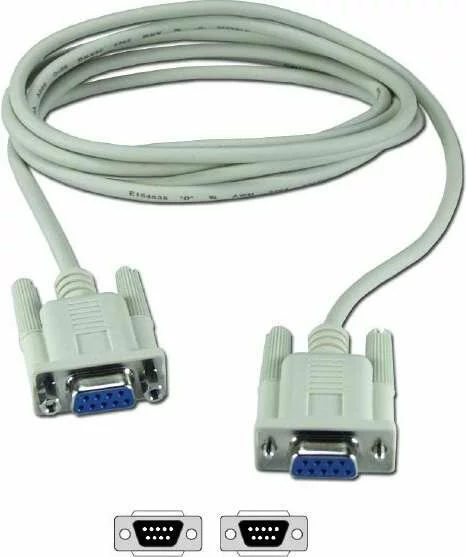
O RS-232C : Use it when connecting to your PC.
@ S/PDIF : Disital Audio Output
,-t* 1 *r
T} JIJ

Various equipment and TV/VCR can be connected to receiver.
This manualwill explain common ways to connect to the equipment.
lf you are using RF cable, please synchronize the RF channels of the TV and VCR.
lf you experience any problem, please contact your sales agency.
1. How to connect the receiver to a TV set
O Connect one end of the SCART cable to the TV SCART socket on the back of the receiver
and the other end to the SCART input socket on your TV.
@ Connect the LNBIDish] cable to the lF input connector of receiver.
@ lf you want to use an RF cable, connect one end of a RF cable to the TV OUT connector on
the receiver and the other end to the RF lN connector on your TV.
(O Connect your TV Arial cable to the ANT lN connector on the receiver for receiving terrestrial or
cable channels.
2. How to connect the TV and VCR
O Connect one SCART cable between the TV and the TV SCART socket on the receiver.
@ Connect the other SCART cable between the VCR and the VIDEO SCART socket on the receiver.
@ Connect one end of an RF cable to the TV OUT connector on the receiver and the other end to
the RF lN connector on your VCR.
@ Connect one end of a RF lead to the RF OUT connector on your VCR and the other end to the
RF lN connector on your TV.
@ Connect your TV antenna to the ANT lN connector on the receiver for receiving terrestrial or
cable channels.
@ Connect lF input connector of the receiver and antenna.
3. How to connect the Audio system
O Connect the AUDIO R, L terminal
of the receiver and the LINE, AUX,
SPARE or FXTRA input socket
using the RCAiCinch stereo cable.
-o*

1 . Channel lnfo Banner
«/ The details of services such as sate,lite name, channel iniorrnation, channel
names, program names and lock, scrambied, teletext, audio slatus, and now,
nexl EPG will be displayed when pressing the «lNFO» buttcn on ycui reincte
control or changing channels.
2. To change channels in View mode
u’ Press the channel number you wish to watch.
/ Press «OK» button to display channel llst already searched,
/ Press the «CH^», «CH-» button to chan0e channel.
/ Fress «LEFT<«, «R|GHT>» buiton to move to all/free/scramble/favorite channel list
/ Press «OK» button to select a channel.
/ Press «BACK» button to view previously watching channel.

3. Channel list
/ Press the «OK» button to display channel list already searched.
/ You can change All SAT, Satellite, Scramble and Sort List mode by pressing
the «RED, GREEN, YELLOW and BLUE COLOR» button.
/ Press the «CH^ «, «CH- » button to change sub list.
/ Press the «LEFT{«, «RIGHT>» button to change satellite list.
/ Press the «OK» button to select list and to display the selected channel list.
/ Press the «BACK» button to previous list.
4. Volume Control
» To increase or decrease volume, use the «Voi +»,» Vol -» buttons.
/ To temporarily cut oft the volume, press the «MUTF» button.
» To cancel mute, press the «MUTE» button once again or press the
«Vol +», «Vol -» buttons.
5. Satellite List
/ Press the «SAT LIST» button to display
the selected saiellite Iist.
/ Press «OK» butlon on a name to display and
to select ail channel iists in the satellite.
/ Press the «OK» button to select a channel.

6. Favorite Channel list
/ Press the «FAV» to display favorite group list.
» There are 12 favorite group list, «SPORTS, MOVIE, NEWS,MUSIC,CARTOON,
DRAMA, DOCUMFNTARY, SHOPPING, FELIGION, LIFE, ADUtT, TRAVEL».
» White favorite group list shown, press the «FAV» to select Favorite group.
/ ln the desired favorite group, press the «CH^», «CH-» button to change
channel list.
/ Press the «RED; GREEN, YELLOW and BLUE CORLOR» button to change other
f unction./ Press the «LEFT{«, «RIGHT>» button to move to the satellite favorite
channel list.
/ Press the «OK» button to select a channel./ Press the «EXIT», «BACK» bution to to view previously watching channel.
7. Changing Mode (view mode — menu mode)
/ You can change view mode to menu mode
/ You can change menu mode to view mode
by pressing «MENU» button
by pressing «EXIT» button.

8. Useful Function/ By pressing the «TV/RADIO» button, vou can change TV/ Radio mode.
/ By pressing the «PALJSE» button, you can pause the screen and you can cancel
this function by pressing «EXIT» button.
/ By pressing the «AUDIO» button, you can change audio mode’
/ By pressing the «TEXT/SUBT» button, you can use text/subtitle function and you
can cancel this function by pressing «EXIT» button.
/ By pressinq the «PAL/NTSC» button, you can change the PAL, NTSC and AUTO
tv mode.
/ By pressins the «SLEEP» button, you can setting SETTOP BOX off time.
/ By pressinS the «ZOOM» button, you can use zoom function and cancel this
Function by pressing «EXIT» button.
9. Program Guide mode
/ By pressing the «EPG» button, you can get information about each channel.
/ By pressin0 the «CH^», «CH'» button, You can change the channel’
/ Press the «RED, GREEN, YELLOW » button to change other function’
r’ By pressing the «OK» button, you can get information selected channel.
/ By pressing «EXlT», «BACK» button, You can cancel this function.

pluS in the receiver. Then press the «0» button on the remote control ot lhe
«standby» button on the receiver front panel. The Main klenu screen, the beginning
of the OSD screen, will appear as shown in the following picture. The lrlain I’vlenu
displays various functions of the receiver or you can select with «CH^», «CH-«and
the numeric buttons on the remote control. When a function is selected. lhe tille o1
the function changes its color. To ptoceed to the next stage, f;ress the «OK» button
on the remote control. 80
The installation menu allows you to set the Antenna
and various functions, and customize service’ After
selecting the «Main Menu» function and pressing the
«OK» button on the Main Menu scteen or selecting the
«Service Searching» function and pressing the «OK»
button to skip main menu. Use the «CH^»‘ «CH-«
buttons on the remote control to seleci an option and
press the «OK» button to proceed to the next stage. To
move backwards io the prevlous stage, press lhe
«Back» or «Menu» button.
1.1 Service Searching
Select «service Searching» function from the
lnstallation» menu and press the «OK» button. More
inlormaiion about «service Searching» function can be
obtained from your sales representative’ the lnternet or
satellite broadcasting magazines.
You can use useful function by pressing the «FED,
GREEN, and YELLOW » buttons.
1.1.1 EDlr
O Sat. Name : Select the name of the satellite’ See
the Sat list bv pressins the «OK» button’

@ LNA power : Turn on/off the LNB’ Power’
@ LNg Frequency : LNB Frequency value can be
selected by using the » {a proper value by using numeric buttons(O-9)’
@ 22KHz: Select 22KHz On/Off/Auto to control
and external tone switch.
@ 0/12V : Select 0112V On/Off to control
@ OiSgqC : DiSEqC must be used when using two or
more antennas and LNBs. Select None, DiSEqC
1.0, DiSEqC 1.1, MOTOR and USALS
O Committed : Set the port number of DiSEqC 1.0
switch.
@. Uncommitted : Set the port number of DiSEqC 1 ‘ 1
switch.
@ Save : After Setup complete, Press «RED» Button
to save
O When selecting «MOTOR» Yellow Color button.
1) DiSEqC 1.2 Motor: You can move the motor to
the left or risht bv pressing the «‘(«, » )» kevs
continuously, but when you stop pressing the
2) Save : When you press the «OK» key, current
position of the DiSEqC motor will be saved.
3) Go to Reference : Move to the position «0».
4) Calculation : The difference between the current
position and the new position of the current
satellite is applied to all the other satellite also’
5) Limit : You can set the maximum move extent.
You can control «Enable» or «Disable» mode’
When you select «Enable», «East limit» and
«West Limit» will be activated’ Press the «OK»
key, then current position will be restored as
each limit.
6) Reset : After select the «Reset» and press the
«OK» key, the original value of motor will be
restored.

I
I
O When selectins «USALS» Yellow Color button
lf you have a USALS motorized system, you
must set your position (latitude and longitude) in
order to calculate all motor positions f or
viewable satellites.
You should refer to the motor’s manual to get
information for installinq a USALS motorized
system.
1) Longitude & Latitude : lnput the value of latitude
and longitude in which the dish-installer is
placed, press «NUMERIC» button.
2) Current Satellite : lndicate the current satellite
name.
3) Rotate : To move the motor to the stored
position, press «OK» button.
4) Limit : You can set the maximum move extent.
You can control «Enable» or «Disable» mode.
When you select «Enable», «East limit» and»West Limit» will be activated. Press the «OK»
key, then current position will be restored as
each limit.
5) Go to Reference : To clear the east & west
limit, press «OK» button.
— 16-

.1.2 RENAME
Select the satellite name you would like to rename
and press the «OK» button. By using the «BACK»
buttons, Move to be previous menu.
Press «GREEN» Button to Save.
.1 .3 SCAN
You can select the satellite you want to scan by
using the «4»,»v» keys. You can also select
numerous satellite simultaneously by pressing the»OK» key consecutively, then the selected
satellites will be highlighted.
Network : lf you want to have all other
transponder information, you need to select
network «On».
Search Mode : You can select All / FTA option
mode in each satellite by using the { } keys.
All : scan all channels, FTA : skip all scrambled
channels.
Press the «OK» key and Scan will begin.
STB will automatically search all TViRadio channels
from a satellite and save them into the channel list.
You can see the progressive status of channel
searching. Press the «RED» or «EXlT» key to stop
Channel Search. When the Channel Search is
completed, the result will be saved and the first
channel of the searched ones will be displayed.
CI
e)

1.1.4 TRANSPONDER
It will be more convenient to use ihis procedure whenyou want to search the channels for a specified
transponder offered from the satellite. Select any
transponder that you want to change the setting
parameters or to scan, by using «4», «v» keys.
You can also select numerous transponders
simultaneously by pressing the «OK» key
consecutively.
1) EDIT : Press the «RED» key to change the
parameter values of the selected transponder.
Place the cursor on the sub menu by using the» L» , «Y» keys and Press the » 1″ , » )» or»NUMERIC» button to change the setting.
2) ADD : lf you cannot find the desired transponder
from the transponder list, you can add it by
inputting appropriate parameter values for a new
transponder. When you want to change the
parameter of an existing transponder, select the
parameter using the » L» ,»Y» keys and change its
value by using the
3) SCAN : This option will enable you to search all
channels broadcasted over a specific transponder
using its predefined information. Select the
transponder from transponder list which you want
to search, by using the «4»,»V» keys. You can
also select numerous transponders simultaneously
by pressing the «OK» key consecutively, then the
selected transponders will be highlighted.
lf you cannot find it from the transponder list, you
should insert all the setting parameters.
4) DELETE : Press the «BLUE» key to delete the
selected transponders.
— 18-

O6
1.2 Database Upgrade
Leis you download database by RS-232 cable.
Connect two receivers with RS-232 cable.
The Receiver which receives database
selects a » Receive » mode,
the Receiver which sends database
selectsa»Send»mode.
@ Press the «OK» button.
-1 9-

1.3 lnitialize STB
«lnitialize STB» function formats all information
including the existing parental lock code and favorite
channels to the initial condition. After selecting»lnitialize STB», A’warning message as shown right will
be displayed. lf you press the «OK» button, all preset
information will be formatted.(default value : «0000»).
2,:,,:Ohah:n.el,M an ag er
2.1 Channel Edit
You can delete, lock, rename & move channel’sposition in the channel list.
Delete : Select the searched satellite name , and
press the «RED» button. By using the «EXlT»,
«BACK» buttons, Move to be previous menu.
Lock : You can select the channels that you want to
lock or unlock by using the «r», «v» keys. And
press the «GREEN» key to confirm your selection.
Once the program is locked, you can not watch the
locked channel till you change the configuration
from «Lock» to «Unlock» in the channel edit menu
or List Menu. The symbol of «Lock» is marked at
the right side of the channel name on the «Channel
Edit» List.
O
@

@ Rename : Press the «YELLOW» key to select
the channels that you want to change the
channel name, then the following «Channel
Rename» menu and keyboard screen will be
displaYed. Use the » L»,»v» and » {keys to place the cursor on the desired
character and press «OK» key to select
@ Move : Press the «BLUE» kev to select the
channels that you want to move its position of ,
and place the cursor on the position where
you want to move it by using the «r», «v»
keys and press the «OK» key to confirm.
2.2 Favorile GrouP
You can edit the Favorite Channel List, which
facilitates you to easily find your favorite channel
from the Channel List. You can choose TV or
Radio Channels in an alternative way by pressing
the TV/Radio kev
O Sorting : Press the «RED» kev and the
Following «Program Sorting» menu screen will
Be displayed. You can rearrange the lists by
satellite, FTA / scramble, or alphabetically’
@ Register : Before you can use the «Favorite
Channels List», you must first register your
favorite channels into the favorite list.
The list screen is divided into two, the list on
the left displays all channels available and the
list on the right displays selected favorite list’
You can select the channels that you want to
register into favorite groups by using the «4»,»v» keys, press the «OK» key to confirm your
selection. Then press the «GREEN» key and
the selected channels will be added to each
group of the favorite channel list.
netffi.w.a’67-Ogc6rraIra*

I
@ Fav-Rename : Press the «YELLOW» key to change
the name of Favorite Group, then the following»Favorite Rename» menu and keyboard screen will
be displayed. Use the «L», «Y» and «{keys to place the cursor on the desired character
and press «OK» to select.
@ Delete : You can also delete channels from the
favorite channel list by pressing the «BLUE» key
after selection by using the «r»,»v» & «OK»
keys . Press the «BACK» key to return to the
previous menu
3 ;,,S !$tOr’n 1qetln g
3.1 Language Setting
To select the desired language of the Menu &
Subtitle or Soundtrack. Place the cursor on the
sub menu by pressing the «r», «v» keys and
press the
The Lansuage of Menu & Subtitle or Soundtrack
will be changed to the selected language

3.2 Video Settings
O TV Scart Mode : Select your Tv scart video
output format, RGB/CVBS, by pressing
the «{
@ Aspect ratio : Select your screen format,
AUTO/4:3 Normal screen/16:9 wide screen
According to Tv Type, By pressing the
@ Letter Box : You can select «ON» When the
format of your TV set is 4:3 and video source
is 16:9, then the screen will display the
letter box mode.
@ Transparency : Set the level of OSD
Transparency, it varies from 0 to 40.
Default : l06 Disptay Channel lnfe : lf you select «ON»
that the symbol of TV/Radio, Locked, teletext,
Date,Time, Current program information
(title,running time) or scrambling service is
displayed when broadcasters of the desired
service support.
@ TV PAL/NTSC : Changes PAL or NTSC
TV mode.
3.3 Modulator settings
RF Type : Select TV standard Type.
(PAL B/G, PAt I, PAL D/K, NTSC)
RF channel ; Select the FF channel number
from 21 to 69.
Default RF Channel : 38
o
@

CI
o
@
@
3.4 Clock settings
Daylight Saving Time : Select the «Daylight
saving time» «ON/OFF» mode by using the
Adjust Time Zone : You can set the Current Time(Local area time) in this mode. To set the Current
Time, select the value using the standardized
information of current service area by pressing
the «{«, «}» keys.
On Timer : Sets up hour and minute of your
receiver Power on time. Enter a Power on time
by using numeric buttons(0-9).On Timer Mode : Powers on receiver by setting
ihis option with «Once» or daily» by pressing the
3.5 Lock Settings
Select «Lock Settings» from the «Main Menu», andyou will be requested to insert the password.
Default Password is «0000».
System Lock : To lock the receiver, select»System Lock» in the «Lock Settings» menu and
change it to the «ON» mode by using
keys. lf the receiver is locked, whenever you tryto start the STB, the «Password» screen will
appear and you will be asked to enter your
Password
Channel Manager Lock: To lock the Channel
Manager, select «Channel Manager Lock» in the»Lock Settings» menu and change it to the «ON»
mode by using the
O
(

@ lnstallation Lock : To lock the lnstallation menu,
select «lnstallation Lock» in the «Lock Settings»
menu and change it to the «ON» mode by using
the «{» «)» keYs
@ Change Lock Confirmation : When this option is
set to «ON», Pin Code will be required to watch
the locked channels.
When this option is set to «OFF»‘ Pin Code will
not be required to watch the locked channels.
@ Change Pin Code: You can change your
Password from the factory default value «0000»
as follows: Select «Change Pin Code» in the
«Lock Settings» menu. You will then be asked
for a new password. Once you enter a new
password, the system will ask you to re-enter
for confirmation. When you have entered a new
passWord twice, the password has been
changed. lf you forget the password, contact
the distributor to recover it.
3.6 System lnformation
Current Receiver boot loader, software version
and hardware version disPlaY

4:i:lutltltt
This STB supports additional functions such as
Calendar and Games.
O Calendar:,’v,,
@ Tetris»oK»
Previous Year «A» : Next Year
Previous Month «>» : Next Month
: Drop «4» : Rotate
Move Left «)» : Move RiSht

You can enioy not only Free-To-Air services
but also scrambled services using the
Smart card. This receiver currently supports
various types of Smart card
(Alphacrypt, Aston/Seca, lrdeto, VIACCESS’
Nagravision, CONAX, CryptoWorks and more).
Smartcards is available from your dealer or
from your service Provider.
lf no Smart card is used, then only free-to-airprogrammes will be received.

O Trouble shooting
:::t&:Picuit|*t!.9l:€q!Cq!r:S9{, li.lr.
Satellite system is lncorrectly installedCheck all connections and leads, adlust
satellite antenna, check LNB.
Faulty LNB Replace LNB
Faulty TP Replace TP
High levels of sjgnal loss through cables Use a signal boostel or replace cables
Faulty connection Repair connection
Batteries exhausted Check batterles
lncorrecl function selected Press correci lunciicn key
Remote control not pointed at device.Make sure your remote controi is pointing
on your device
lncorrect cable conneciing receiver and TV Check SCAFT cable
lncorrect volume value Check volume value
-24-

lnput
input f’requency 950-21 50MHz
Connector F-Type
lnput lmpedance 75 Ohms
lnput Level *25 — -65 d$m
LNB Power 1411BV DCr5%
LNB Ccntrol 22KHz, 6O0mVo,o
DiSEqC Ver l.0i 1.1/1.2/ USALS
Maximum Currenl 5{l0mA Overload Proteclion
Demodulation QPSK
Symbol Fate 2-45 Mbaud (SCPC/MCPC)
Video
Decoding MPEG_II
Output NTSCi PAL(Auto)
Aspect Ratio 16:9. 4:3
Resolution 720 x4B0( I SC)/720 x 5 /6(oAL)
Outout Level lVo-o / 75Ohms
Outout Connector BCA Phone Jack. TV/VCR Scart
Audio
Decoding MPEG-1, Layer 2
Bit Rate Max. 384Kbps
Outout Level 0 dBm
Output lmpedance 600 Ohms Unbalanced
Output Connector RCA Phone Jack, TV/VCR Scart
DigitalAudio Output S/PDIF Fiber Optic(fiesolution:20bits)
Serial DataConnector 9 Pin D-sub
Sis nals RS232, 1 15,200Kbps
Front Panel4 Digit 7 S€gment Display
Standby, CH UplDown, Vol Up/Down, Menu, OK
RF
Modulator
RF-Connector’ 75Ohms. IECl6S-2 Male / Female
Frequency 470MHz to 860 MHz
Output Channel cH2 1 -69
TV Standard PAL B/G, PAL I, PAL D/K, NTSC
Remote Control gm l,,4in
Supply Voltase l,101240V AC, 50/60H2
Power Consumption 25 Watts Max
Dimension 300x220x60 (wxDxH)
Operating Temperature 0’C to 5O’C
-29-
Не корысти ради…:-)
Это мое «видение» 
Screen Shot не делал, так как не видел в этом смысла.
Да и еще, в Вопросах-Ответах взял информацию с сайта www.cardsharing.cc
1. С чего начать?
Вы решили подключиться к шарингу. Но вот проблема, не имеем представления что это и как. Этот известен всем и все через него проходили. Кто-то быстрее, кто-то медленнее…
Вы счастливый обладатель OPENBOX . Но все «вкусное» в трансляциях закрыто. У Вас есть 2 выхода.
Купить официальную карту и смотреть. Но, хорошо тем, кто живет в крупных городах, а как смотреть-платить в глубинке? А как заказать карту (к примеру) Premiere? А как быть с картами, которые продаются только гражданам страны со спутника которого ведется вещание? Отвечаю: Пока никак.
Просто подключится к Шаринг — Серверу. Если Вы считаете, этот способ по морально-этическим причинам Вам не подходит – оставьте чтение этого спича. Но помните, «Услуга считается нормальной, когда есть выбор». Какой выбор есть у граждан ex-USSR? НТВ+? И как быть с теми, для которых НТВ+ идет в «кастрированном» варианте? (Привет «НТВ + Украина»)
Так вот, картшаринг – это предоставление с помощью Интернета ключей доступа к закрытым пакетам.
С этим разобрались.
Что бы подключится необходимо:
Желание
Интернет (можно GPRS, Dial-Up – но лучше всего – ADSL)
Ресивер с программным эмулятором кодировок. Чем больше кодировок знает Ваш ресивер – тем больше каналов откроется.
Программа с настройками, которая будет получать ключи.
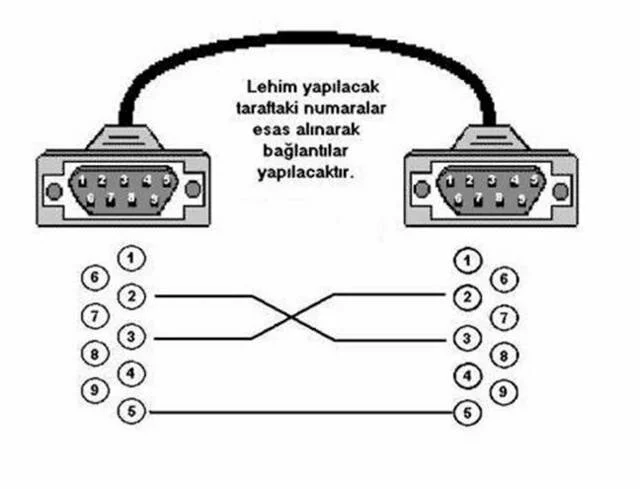
0-модемный кабель для связи OPENBOX и Компьютера. (Кабель, его распайку можно найти везде).
2. Настраиваем OPENBOX .
Для настройки кодировок, предварительно Вам надо знать, что Вы будете смотреть.
В Sat-мире есть такое обозначение кодировок:
CAID Кодировка
0500 Viacess
0100 Mediaguard
090F Videoguard
0DXX Cryptoworks
06XX Irdeto
0B00 Conax
17XX Beta-Crypt
18XX Nagravision
Страшные названия, на первый взгляд. Но все они становятся «ласковыми», когда включается в работу картшаринг
см.прайс
Соответственно, Вам надо выбрать пакеты, которые Вы будете смотреть.
Как посмотреть тематику пакетов? http://www.lyngsat.com/packages/europe.html
Кликнув на пакете – откроется список каналов с транспондерами.
Кто не знает, что такое транспондер, закрывает этот документ, и идет читать азы про Sat-Tv. Для экономии своего времени.
Допустим, Вы выбрали пакет TPS (13E) и VIASat Nordic (5.0E)
Настроить ресивер в данном случае:
TPS (смотрим по рисунку) кодируется Viacess и MediaGuard.
Включаем Ресивер.
Нажимаем кнопку «Меню»
Набираем магические цифры 1117
Попадаем в скрытое меню.
Ищем меню «Шаринг». Открываем его.
Нажимаем на пульте «Зеленую» кнопку.
Зажигаются желтые крестики. С помощью стрелок на пульте (вверх вниз) выставляем код 0500. Это CAID.
Нажимаем желтую кнопку «Запомнить»
Нажимаем на пульте стрелку «Вправо»
Попадаем в правую часть экрана.
Нажимаем «зеленую» кнопку.
Зажигаются желтые крестики в поле PROV. С помощью стрелок на пульте (вверх вниз) выставляем 022500. Это мы ввели IDENT.
Сохраняем с помощью нажатия на «желтую» кнопку.
Все. Мы объяснили ресиверу, что все каналы с CAID 0500 и PROV 022500 – мы будем посылать через Com port на Компьютер.
Точно так же вводится и MediaGuard. Но, вот незадача. В CAID 100, в поле PROV не 6 символов, а 4…. Откиньте 2 первых 0 и вводите.
С 09F0 еще интересней. Тут поля PROV нет. А на нет и суда нет. J Значит – не вводим. Хватит ему одного CAID.
Маленькое замечание, при вводе B-Crypt не заполняйте поле PROV 0. Оставьте не заполненным.
Ух.. По моему сделали. Не показывает? Значит, не все сделали.
Доделаем в следующей главе.
3. Настраиваем программу шаринга
MPCS. Отличная программа, настраивается правда не GUI но зарекомендовала себя как устойчивая, не требующая ресурсов.
Можно конечно, расписать каждую строчку config. Но я это делать не буду, так как целью у меня и у Вас настроить OPENBOX . Думаю, кто захочет – найдет.
Я кину только config и красным цветом отмечу, что заменить на свое с учетом параметров.
Mpcs.user
[account]
User = tuner
Pwd = tuner
Group = 1
Mpcs.conf
[global]
Nice = -1
ClientTimeout = 5
LogFile = stdout
[newcamd]
Key = 0102030405060708091011121314
[serial]
Device = tuner@/dev/ttyS0?delay=1&timeout=400
Вместо 0 подставить номер КОМ порта на компьютере. 0-COM1, 1-COM2 и т.д.
Mpcs.seerver
reader]
Label = newcamd
Protocol = newcamd
Key = 0102030405060708091011121314
Device = АдрессСервера, ПортСервера
Account = Логин,Пароль
Fallback = 0
Group = 1
ReconnectTimeout = 20
Все эти данные станут известны после покупки.
4. Покупка теста и подписка на Пакет для шаринга
В Вашем случае, через билинг берется тест, и сравнивается.
Приблизительная схема подключения для Новых пользователей.
1. Регистрация на форуме. Обязательно, в логине и пароле не вводить спец символы. Типа: @#$%^&*()_+
2. Регистрация в биллинге (www.cardsharingserver.com) С таким же Паролем — Логином как и на форуме.
3. Перечисление нужной суммы с WM-кошелька со страницы биллинга (обязательно с IE, Maxhton например — глючит)
В IE должно быть разрешение на запуск и установку ActiveX. По умолчанию, она включена) на баланс свой.
При удачной операции — увидите сумму на балансе. Будьте внимательны! Это Ваши Деньги. Если перечислили не так — это становится проблемой модераторов (в некоторых случаях) и стоит 5 WMZ за 1 ляп. (Думаю, законно. Стимулирует к порядку. Нас иного, а их не очень )
4. Через Меню в биллинге выбираем нужный пакет. В combo (там где стоимость) выбираем тест.
7. Жмем кнопку «Оплатить».
8. В разделе на биллинге «Моя подписка» имеем все данные для просмотра. Порты, адрес сервера.
9. Логин — Пароль — тот же, что и на форуме, биллинге.
Откорректируйте настройки MPCS для теста.
ВАЖНО! Если время теста закончено, обязательно удалите настройки теста!
И так, при покупке пакета стоит повторить операцию как при покупке теста.
Только в опциях пункт 4. выбрать не «Тест», а сам пакет.
В путь, думаю, все у Вас получится. У меня ж получилось, а мне надо говорить по 2 раза J
5. Часто задаваемые вопросы. (С форума www.cardsharing.cc)
Все ответы Вы получите на форуме. Перед тем как задавать вопросы, посмотрите не встречается ли он…
http://www.cardsharing.cc/index.php?topic=1673.0
Некоторые проблемы, что я столкнулся с ними:
Перед тем как «кричать» по поводу «у меня не открывает» надо:
1. Убедится что канал открывается той кодировкой, что Вы ему прописали. (В ресивере)
2. Что канал не входит («За дополнительную плату» ППВ). Это можно увидеть (как вариант, но не аксиома) на сайте ru.kingofsat.net. А еще лучше — на сайте пакета. Как найти сайт? На том же ru.kingofsat.net
3. Возможен конфликт кодировок (это касается Опенов). То есть, канал кодирован 2 (или больше кодировками)
2 из них прописаны у Вас в ресивере.
Например:
Premiera 19.2E бета-крипт и награвижен 2. (кодировки 1702 и 1801)
Цифровой Польский награвижен 1801.
У Вас поддерживается кодировка шарингом для Премьеры 1702. Но, при наличии в эмуляторе строки 1801 она будет посылать запросы на сервер в Награвижен 2.
Как лечится…
Выбрать какой пакет приоритетней. Если премьера — убрать 1801. Если Цифровой Польский — оставить как есть.
Точно такая штука происходит и с MCT 13Е и Гречиским Нова 13Е. Если есть в емуляторе Нова — часть каналов МСТ не откроются из-за присутствие там кодировки Ирдето 2. Надо выбрать.
Переписка по поводу PPV
mankurt>> Canal+ France, Canal Nederlande в секе с 19°Е прет у кого-нибудь?
Moderator>> Ключи ТПСовские удалите из эмулятора и все пойдет.
Идент виаксеса 022600. Если вы про мультивижны, то это ППВ каналы. (1 фильм — 3-5 евро)
Из этого поста ясно, что пакет Французский Multivision является платным и шарингу не подлежит. Узнать «кажыть чи не кажыть» J идеально путем покупки теста.
[вложение удалено администратором]
Инструкция по прошивки ресиверов Openbox f300-x800-810-820


Для прошивки ресиверов Openbox f300-8xx вам понадобиться – программа для заливки софта “openbox update” скачать можно ниже. Также вам понадобиться сам софт скачать можно ниже, нуль модемный кабель – если нету кабеля его можно сделать самому,
берем “cm1” разёмы (так называемые папы) паяем 5 ножка на 5 это минус, 2 ножу на 3, 3 ножку на 2, делаем кабы крест на крест. Один конец нуль-модемного кабеля подключаем к компьютеру , другой к ресиверу только предварительно выключаем ресивер из сети 220в, это делается для безопасности, чтоб статикой не убить микросхемку в ресивере, Запускапаем программу “openbox update” мышкой кликаем “serial port” выбираем нужный порт (по умолчанию стоит com1) затем клкаем “file” потом “open” выбираем нужный софт (который вы предварительно скачали) кликаем открыть, затем кликаем “update”, если все сделано правильно то должна появиться надпись “connecting”. Включаем ресивер в сеть 220в, должны увидеть надпись “ok connection- downloading” и снизу проценты загрузки, все процесс пошел, затем появиться надпись “wait please! Don’t power off”, что означает не выключайте ресивер идет сохранение флеш памяти. Ждем до появления надписи “completed to update stb” жмем “ok” прошивка прошивка завершена. Выключаем ресивер из сети, и снова включаем, сбрасываем ресивер на заводские настройки, (на пульте жмем меню, выбираем вкладку instollation- установка заходим в нее, опускаемся на initialize stb- сброс настроек) универсальный пин код “9200”. Многие софты имеют дополнительное меню, чтоб воспользоваться этой опцией – нажмите меню и наберите цифрами “1117” это меню называется эмулятор. Тут вы можете редактировать ключи прямо с пульта. Выше приведенная информация служит только в ознакомительных целях.
Программа для прошивки 
Прошивка openbox F-300, v 5.33
Переделка openbox F-300 на openbox X-800
Прошивка для ресивера openbox X-800 v 5.49
Прошивка для ресивера openbox X-810
Прошивка для ресивера Х-820 v 5.49
Скачать схемы для ресиверов openbox
{jcomments on}
Похожие статьи:
-
22.03.2011, 00:07
#1
Инструкции для Openbox F300 – Х8хх
Инструкция OpenboxX-300_ManuRu
Инструкция OpenboxX-810_Manual_Ru
Элитарная среда работы с данными Openbox F300 – Х8хх OPENBOX COMMANDER
-
24.05.2011, 21:53
#2
FAQ по ресиверам Openbox F-300FTA, X-800/ 810/ 820CI
Как бороться с « COM port connection time out »
Советы:
1- Прозвоните нуль-модемный кабель, если усики тестера не получают, используйте скрепки, иглы, булавки.
2- Скачайте несколько загрузчиков.
3- Скачайте несколько прошивок, желательно из разных источников, почитайте отзывы о прошивках
4- Просмотрите в процессах, которое бы не было до запуска прогамми, процесса pobedit.exe
5- Проверьте, совпадают ли Сом порты в программе и диспетчере устройств
(win-key+pause, break оборудование, диспетчер устройств, порты)
описание в приобщенном файле
Нет сигнала? Настройка бесплатных спутниковых каналов на тюнере openbox X800,X810,X820
Настройка каналов на старом OPENBOX X800, X810, X820 2020
Настройка ресивера Openbox X 800
Похожие:
Наш проект живет и развивается для тех, кто ищет ответы на свои вопросы и стремится не потеряться в бушующем море зачастую бесполезной информации. На этой странице мы рассказали (а точнее — показали вам Как настроить спутниковый тюнер openbox x800. Кроме этого, мы нашли и добавили для вас тысячи других видеороликов, способных ответить, кажется, на любой ваш вопрос. Однако, если на сайте все же не оказалось интересующей информации — напишите нам, мы подготовим ее для вас и добавим на наш сайт!
Если вам не сложно — оставьте, пожалуйста, свой отзыв, насколько полной и полезной была размещенная на нашем сайте информация о том, Как настроить спутниковый тюнер openbox x800.