- Manuals
- Brands
- AERMEC Manuals
- Remote Control
- EWPE SMART
- User manual
-
Contents
-
Table of Contents
-
Bookmarks
Quick Links
EN
2 0 . 0 6 _ 5 1 4 0 5 6 1 _ 0 0
T r a n s l a t i o n f r o m o r i g i n a l
E W P E S M A R T
U s e r m a n u a l
APPLICATION FOR THE REMOTE
CONTROL OF DEVICES
w w w . a e r m e c . c o m
Related Manuals for AERMEC EWPE SMART
Summary of Contents for AERMEC EWPE SMART
-
Page 1
2 0 . 0 6 _ 5 1 4 0 5 6 1 _ 0 0 T r a n s l a t i o n f r o m o r i g i n a l E W P E S M A R T U s e r m a n u a l APPLICATION FOR THE REMOTE CONTROL OF DEVICES… -
Page 2
Dear customer, Thank you for choosing an AERMEC product. It is the fruit of many years of experience and special design studies and has been made of the highest grade materials and with cutting edge technology. The data may undergo modifications considered necessary for the improvement of the product, at any time and without the obligation for any notice thereof. -
Page 3
CONTENTS PRODUCT PRESENTATION ………………………………….5 DOWNLOADING AND INSTALLING THE “EWPE SMART” APP VIA A SMARTPHONE OR TABLET ………….6 STARTING THE “EWPE SMART” APP AND ACCOUNT REGISTRATION …………………….7 NAVIGATING THE APP …………………………………….9 ADDING A SPLIT UNIT ………………………………….10 ADDING A HEAT PUMP ………………………………….18 CUSTOMISING THE SPLIT UNIT ………………………………..24… -
Page 4
COMPANY CERTIFICATIONS CONTENT CLASSIFICATION… -
Page 5
PRODUCT PRESENTATION Using the special app for iOS and Android devices (available free on Apple Store and Google Play), you can control the entire system from a distance, directly from your smartphone or tablet. This manual was creating using version: 1.7.5.5 Android operating systems. -
Page 6
1. Access the Store from your device: • App Store — for Apple devices. • Google Play — for Android devices. 2. To perform the search, key in: “Ewpe Smart”. 3. Scroll through the various apps that appear until you find the following icon 4. -
Page 7
STARTING THE “EWPE SMART” APP AND ACCOUNT REGISTRATION WARNING Before starting the app, deactivate your device’s data connection from the settings menu. STARTING THE APP Search for the “EWPE SMART” icon on your device and start it. ACCOUNT REGISTRATION 1. After starting the app, the following screen appears: 2. -
Page 8
ACCESSING YOUR ACCOUNT If you already have an account, it can be accessed from the home page by tapping “Sign in”. WARNING The screen in point 1 appears only the first time the App is started after installing it on your device. -
Page 9
NAVIGATING THE APP Description Home screen menu/profile Adding a unit “Control groups» section Unit Switching the unit on/off Temperature adjustment HOME SCREEN HOME SCREEN MENU Description Profile settings “Control groups» settings Home management Messages In-App guide/help Indications App settings… -
Page 10
ADDING A SPLIT UNIT AUTOMATIC PAIRING PROCEDURE Reset the wifi module prior to pairing: To reset the unit’s WiFi module, refer to the specific WARNING procedure indicated in the user manual for the unit’s The automatic registration procedure must be remote control/wired panel provided together with the completed within 2 minutes of resetting the package. -
Page 11
3. Once all the procedures listed on the screen are 6. The application will ask you to enter the name and complete, tap «Next”. password for the WiFi network to which you want 4. Check that the WiFi icon is active on the remote to connect the unit. -
Page 12
7. The search for the device will start. Once it is found, 8. When the configuration is complete, a notice will it will be automatically added to the list and will appear as shown above. Press OK to continue and appear on the App home screen. -
Page 13
9. If this notice appears, this means that the procedure was not successful. To solve the problem: • Follow the instructions that appear on the screen and tap “Try again”. • Perform manual pairing by tapping «Try to add manually”. -
Page 14
MANUAL PAIRING PROCEDURE 1. Select the device you want to select, in our case tap 2. Select the type of command used to normally «Air conditioning”. command the unit by tapping it. Then tap the top right corner to start the manual pairing procedure. -
Page 15
3. Once all the procedures listed on the screen are 4. The application will show the hotspot signal complete, tap «Next”. generated by the device. Tap “Next”. -
Page 16
5. The application will ask you to enter the name and 6. The device will start to search for the device. Once it password for the WiFi network to which you want is found, it will be automatically added to the list and to connect the unit. -
Page 17
7. When the configuration is complete, the following message appears. Press OK to continue and return to the home screen. -
Page 18
ADDING A HEAT PUMP AUTOMATIC PAIRING PROCEDURE WARNING The automatic registration procedure must be completed within 2 minutes of resetting the unit’s WiFi module. Restart again if pairing was not successful. 2. From the home screen of the heat pump control panel, tap 2020-02-20 08:52 0.0°C… -
Page 19
4. Once the unit’s WiFi device has reset, return to the 5. The application will ask you to enter the name and EWPE APP and tap «Next» to continue. password for the WiFi network to which you want to connect the unit. If the smartphone or tablet is already connected to the network, the application will only ask for the password. -
Page 20
6. Then a search will start for the unit’s WiFi module. 7. If this notice appears, this means that the procedure Once it is found, it will be automatically added to the was not successful. To solve the problem: list and will appear on the home screen. •… -
Page 21
MANUAL PAIRING PROCEDURE WARNING The automatic registration procedure must be completed within 2 minutes of resetting the unit’s WiFi module. Restart again if pairing was not successful. 2. From the home screen of the heat pump control panel, tap 2020-02-20 08:52 0.0°C 0.0°C 25°C… -
Page 22
4. Once the unit’s WiFi device has reset, return to the 5 The application will show the hotspot signal EWPE APP and tap the text to the top right, then on generated by the device. Tap “Next”. the following screen tap «Next». WARNING The password for pairing the detected WiFi device is 12345678… -
Page 23
6. The application will ask you to enter the name and 7. The device will start to search for the device. Once it password for the WiFi network to which you want is found, it will be automatically added to the list and to connect the unit. -
Page 24
CUSTOMISING THE SPLIT UNIT RENAMING THE UNIT Tap the current name of the unit on the “Settings” screen (e.g.: AC5bcf). Then enter the new name you selected and confirm. To access the unit settings, tap “Settings” to the side of Once the changes are complete, tap «Save»… -
Page 25
SPLIT UNIT FUNCTIONS CONFIGURING THE MAIN FUNCTIONS On the home screen, tap the unit you want to command and access its operating interface: Quick unit functions Selecting the temperature Selecting the ventilation speed Customising the unit… -
Page 26
OPERATING MODE CONFIGURING ADVANCED FUNCTIONS The operating modes can be selected by scrolling the To access the unit’s advanced functions, tap the “Func” icons, to the right or left, until reaching the desired one. icon to the bottom left of the operating interface. The available modes are: ”Auto”, “Cool”, “Dry”, “Fan”… -
Page 27
AIR FUNCTION HEALTH FUNCTION Function not available. The Health function is available when the unit is equipped with an anion generator. When the Health function is active, the anion generator starts, absorbing dust and eliminating bacteria in the room. To activate it tap the icon. -
Page 28
ES FUNCTION SLEEP FUNCTION The energy savings function automatically regulates the The “sleep” function automatically regulates the room fan speed and the power of the compressor to optimise temperature without disturbing sleep. It also lowers consumption, in both “Cooling” and “Heating” mode. The unit consumption during the night-time hours. -
Page 29
LEFT AND RIGHT SWING FUNCTION This function is used to regulate the oscillation of To regulate the movement, tap the individual wedges the fins from left to right. To activate it, tap the icon, or swipe to make a multiple selection. whereas to access the regulation hold down the same icon until the next screen appears. -
Page 30
SWING UP AND DOWN FUNCTION This function is used to regulate fin up and down To regulate the movement, tap the individual wedges oscillation. To activate it, tap the icon, whereas to access or swipe to make a multiple selection. the regulation hold down the same icon until the next screen appears. -
Page 31
TIMER FUNCTION It is now possible to set the hours and days the unit The timer is used to set the period of unit operation, switches on and off. Once the operations are complete, hourly or daily. To enter timer settings, tap the tap “Save”. -
Page 32
CUSTOMISING THE HEAT PUMP To access the unit’s customisation menu, tap the top of Tap the current name of the unit on the screen (e.g.: the screen in the centre, in the indicated position. 1e640c85). Then enter the new name and confirm. Once the changes are complete, tap «Save»… -
Page 33
HEAT PUMP FUNCTIONS CONFIGURING THE MAIN FUNCTIONS On the home screen, tap the unit you want to command and access its operating interface. Heating mode OPERATING MODE When the unit is off, select the machine’s operating mode. Cooling mode… -
Page 34
CONFIGURING ADVANCED FUNCTIONS QUIET FUNCTION To access the unit’s advanced functions, tap the “Func” This mode makes it possible to operate the machine in icon to the bottom left of the operating interface. silent mode. To activate it, tap the icon. Then a drop down menu will appear that shows all the functions available for the device. -
Page 35
W-DEPEND FUNCTION PRIORITY FUNCTION This mode regulates the unit based on the set Function not available. temperature to reduce consumption. To activate it, tap the icon. HOLIDAY MODE FUNCTION This function can be activated only when the unit is off. It makes sure that the water delivery temperature never FAST DHW FUNCTION goes down below 30°C / 86°F during winter if no one is… -
Page 36
STATE FUNCTION This function is used to display the unit’s status. Tap the icon to access it. -
Page 37
UNIT ERRORS “CONTROL NOT-IN-LINE” ERROR «ERROR» ERROR This error is mainly related to unit communication If this error appears, immediately check the unit’s problems. To solve it, check: status. It is mainly related to its malfunctions. 1. The connection to the device power supply; 2. -
Page 38
CONTROLLING HOUSEHOLD APPLIANCES giving them the possibility to control the various units After creating your ecosystem, other members can be paired with the group. added (e.g. family members, colleagues, etc.) 1. Tap “Control household 3. Tap «Invite member”. appliances. 2. Tap the group you created. 4. -
Page 39
5. Enter the user name or email. Then tap “Invite member» to complete the procedure. 6. The system will automatically add the new users to your group after matching the account or the email entered. -
Page 42
SETTINGS Here it is possible to regulate the app settings, such as activating vibration when pressed. It is also possible to see the version by tapping “About” and checking if there are new updates. -
Page 44
TÉLÉCHARGER LA DERNIÈRE VERSION: TÉLÉCHARGER LA DERNIÈRE VERSION: http://www.aermec.com/qrcode.asp?q=15587 http://www.aermec.com/qrcode.asp?q=15588 http://www.aermec.com/qrcode.asp?q=15589 A E R M E C S . p . A . V i a R o m a , 9 9 6 — 3 7 0 4 0 B e v i l a c q u a ( V R ) — I t a l y T e l .
Пульт управления VMF-E1 (инструкция по монтажу и эксплуатации)
Пульт управления фанкойлом (термостат) системы с переменным расходом (VMF-E1) с расширенными функциям Инструкция по монтажу и эксплуатации Устройство VMF-E1 представляет собой усовершенствованный электронный термостат для вентиляторных доводчиков (фанкойлов). Для установки панелей VMF-E2 и VMF-E2H вентиляторный доводчик должен быть оборудован соответствующим интерфейсом, панель VMF-E4 монтируется на стену
Плата расширения AERMEC VMF-18 (инструкция по эксплуатации)
Руководство по установке и эксплуатации Система VMF Плата расширения термостата для инверторных фанкойлов AERMEC VMF-18 (инструкция по эксплуатации) VMF-E18 представляет собой передовой электронный термостат, предназначенный для работы с инверторными фанкойлами. Данное устройство устанавливается внутри фанкойла (VMF-E2) или на стене (VMF-E4)
DIP переключатели AERMEC VMF E-18X
Системы кондиционирования с переменным расходом хладагента. DIP переключатели AERMEC VMF E-18X
Панель управления AERMEC VMF-E5 (инструкция по эксплуатации)
Системы кондиционирования с переменным расходом хладагента. Панель управления AERMEC VMF E5 (инструкция по эксплуатации). Пользовательский интерфейс панели, Структура меню, Главный дисплей
Панель управления AERMEC VMF E5 (инструкция по сервису)
Системы кондиционирования с переменным расходом хладагента. Панель управления AERMEC VMF E5 (инструкция по сервису)
ККБ Aermec ANL ANLH (Паспорт)
Воздухо-водяные холодильные машины, тепловые насосы и компрессорно-конденсаторные агрегаты с компрессорами спирального типа Aermec ANL ANLH
Содержание
- Значки и кнопки на пульте управления кондиционером
- Инструкция к пульту кондиционера – что означают кнопки и значки
- «Скрытые» кнопки на пультах сплит-систем
- Последовательность настройки любого кондиционера
- Значки и кнопки на внутреннем блоке сплит-системы
- Инструкции по настройке кондиционера в различных режимах
Значки и кнопки на пульте управления кондиционером
Приветствую всех на сайте Кондиционерщик! Сегодня я постараюсь написать наиболее понятную инструкцию по управлению бытовой сплит-системой. Надеюсь, что после прочтения каждый пользователь сможет управлять абсолютно любым кондиционером.
 Перед включением «сплита» убедитесь, что температура на улице соответствует его условиям эксплуатации. Если для вашей модели вы не знаете допустимых уличных температур, то не рекомендую включать прибор при температуре на улице ниже нуля градусов. Подробнее об этом читайте здесь.
Начну с того, что для использования кондиционера он должен быть подключен к сети. Обычно он подключается или вилкой в розетку или через «автомат» в электрическом щитке. При подаче «питания» на прибор вы услышите звуковой сигнал от внутреннего блока или увидите разовое открытие/закрытие жалюзи. Если электропитание не поступает, то читайте возможные причины.
P.S. Бывает, что некоторые кондиционеры автоматически включаются после подачи «питания» – в этом нет ничего страшного. Просто продолжайте его настраивать по инструкции.
Далее берем в руки пульт…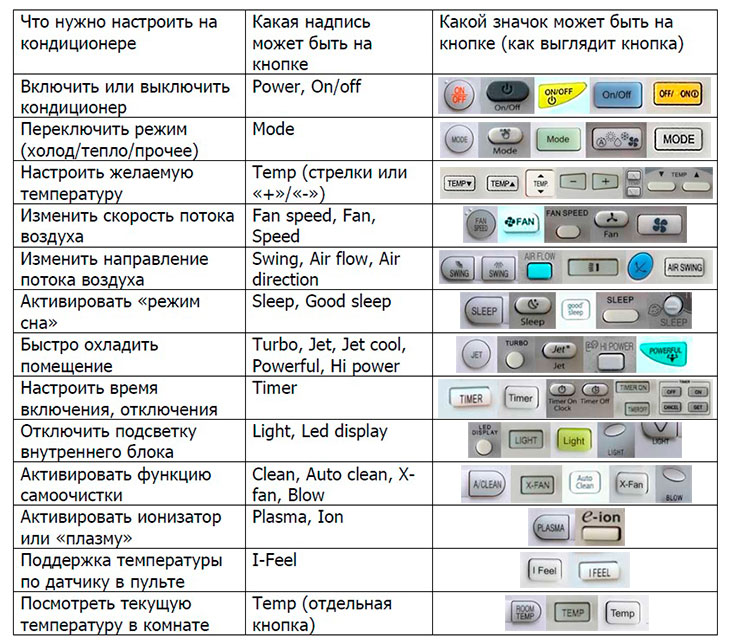
Инструкция к пульту кондиционера – что означают кнопки и значки
Расположу все функции и кнопки в порядке важности от часто нажимаемых к редко используемым.
- Чтобы включить кондиционер нужно один раз нажать кнопку «on/off» – обычно это самая большая выделенная ярким цветом кнопка.


Возможно, после нажатия кнопки прибор запустится не сразу (это зависит от выбранного режима и температуры).
- Чтобы включить нужный режим есть кнопка «Mode» (может быть отображена на пульте в виде нескольких маленьких значков – снежинка/солнышко/капелька). При её нажатии режимы кондиционера переключаются последовательно. В большинстве приборов 5 режимов:
- автоматический (надпись «auto» или значок «треугольника» или другое);
- охлаждение (надпись «cool» или значок «снежинка»);
- обогрев (надпись «heat» или значок «солнышко»);
- осушение (надпись «dry» или значок «капелька»);
- вентилирование (надпись «fan» или значок «вентилятора» — важно не путать режим «fan» с кнопкой регулировки скорости «fan»).

После включения нужного режима важно подождать 5-10 минут пока «кондёр» перестроится.
P.S. Редко попадаются пульты, где режимы включаются не кнопкой Mode, а отдельными кнопками режимов – Cool, Heat, Dry и прочее.
- Чтобы настроить температуру на каждом пульте есть кнопки «Temp». Они могут быть в виде «стрелок» или значков «+»/«-».

Принцип работы простой – какую температуру настроили на пульте, такую кондиционер будет поддерживать в комнате. Например, если настроили 25, то далее прибор будет стараться поддерживать в помещении +25 градусов (многие ошибочно думают что чем выше цифра, тем холоднее прибор будет дуть – это неверно. )
- Конечно, если кондиционер неправильно рассчитан, то он никогда не добьется нужной температуры.
- На некоторых моделях настроенная цифра автоматически меняется на текущую температуру в комнате – не путайтесь.
- Кондиционер не будет холодить, если на пульте вы настроили 25, а в комнате, допустим, уже 24 градуса. Тоже касается и режима обогрева (прибор не будет греть, если в комнате нужная температура уже достигнута).
- Чтобы изменить скорость потока воздуха из внутреннего блока нужно найти кнопку «Fan speed» (это может быть просто «Fan» или просто «Speed», или значок «вентилятора»).

На дисплее скорость вращения вентилятора отображается в виде шкалы или надписей low/med/high/auto (медленная/средняя/быстрая/автоматическая скорости). При настройке автоматической скорости прибор сам выбирает с какой скоростью в данный момент крутить вентилятор.
Настройка скорости не влияет на значение настроенной температуры (например, если настроили 25 градусов, то они же будут поддерживаться). Эта функция влияет лишь на быстроту охлаждения помещения (быстроту достижения заданной температуры).
Важно не путать регулировку скорости вращения вентилятора «Fan», и режим работы «Fan» (вентилирование – переключается при помощи кнопки «Mode»). Также не путаем автоматическую скорость вращения вентилятора с автоматическим режимом работы прибора («Auto» — переключается также при помощи кнопки «Mode»).
- Чтобы изменить направление потока воздуха нужно найти кнопку «Swing» или «Air flow» или «Air direction» (она может быть в виде значков «похожих на стрелки» или «похожих на скобки»).

Поток у любого кондиционера регулируется в двух направлениях – вверх/вниз и вправо/влево. Вверх/вниз у любого кондиционера регулируется кнопкой на пульте. А вот вправо/влево может быть регулировка и в ручном виде (в этом случае будьте осторожны и лучше выключите кондиционер).
Вариаций работы кнопки «Swing» вверх/вниз бывает несколько:
- бывает, что направление меняется в самом простом режиме (один раз нажали – шторки «плавают», второй раз нажали – шторки зафиксировались в любой точке амплитуды);
- бывает, что направление меняется пошагово (один раз нажали – шторка на шаг передвинулась, второй раз нажали – шторки еще на шаг передвинулись и так далее);
- бывает, что положение меняется, как показывает схематическое изображение на дисплее пульта.
Рекомендую с настройкой направления потока поэкспериментировать, чтобы найти самое безопасное положение (чтобы поток воздуха не дул на людей и на зоны отдых домочадцев – подробнее читайте здесь)
Это были основные кнопки, которые есть абсолютно на каждом пульте. Далее разберем дополнительные, более редкие кнопки и функции.
- Чтобы включить «режим сна» используются кнопки «Sleep» (так же может быть «Good sleep»). Алгоритм работы данной функции у всех кондиционеров разный, но объединяет их то, что вентилятор работает на самых медленных оборотах. В данном режиме может автоматически изменяться настроенная температура не более чем на 2 градуса – это происходит постепенно в течение нескольких часов. Связано это с фазами сна человека, чтобы температура ночью при засыпании, пробуждении и в фазе глубокого сна была наиболее комфортной и безопасной.

На дисплее в режиме сна часто изображается значок «в виде луны». Подробнее как работает именно ваша модель при активации данной опции можно узнать только в инструкции по его эксплуатации (идет с документами к «сплиту»).
Примерно такую же функцию выполняет тихий режим «Quiet», только температура автоматически не изменяется.
- Чтобы максимально быстро охладить помещение используется так называемый «турбо режим». Кнопки на пульте имеют надписи «Turbo», «Jet», «Jet cool», «Powerful», «Hi power», или значок похожий на значок «ускоренного вентилятора». Чтобы активировать ускоренное охлаждение нужно один раз нажать соответствующую кнопку. После чего вентилятор внутреннего блока начинает вращаться с наибольшей скоростью. При достижении заданной температуры «турбо режим» автоматически отключается. Так же его можно отключить самостоятельно повторным нажатием кнопки.
- Чтобы запрограммировать время включения или отключения прибора используется таймер. У разных кондиционеров кнопки настроек таймера отличаются. У каких-то моделей всего одна кнопка («Timer»), у каких-то моделей на настройку времени предусмотрен целый блок кнопок («Clock», «Timer on», «Timer off», «On», «Off», «Cancel», «Set» и различные стрелки). У таких моделей настройка интуитивно более понятна – нужно сначала настроить текущее время, затем время включения или отключения «кондёра». А в моделях, где всего одна кнопка «Таймер», функцию переключения времени выполняют стандартные кнопки (регулировки температуры, вентилятора и прочие).


В большинстве случаев настройка начинается с нажатия кнопки «Timer». А далее лучше пользоваться инструкцией для конкретной модели для настройки текущего времени, времени включения или отключения «сплита». Если инструкция утеряна, то попробуйте найти её в интернете. Крайний вариант это пытаться настроить время и таймер так называемым «методом тыка».
- Чтобы отключить подсветку индикации на внутреннем блоке, на некоторых пультах предусмотрена кнопка «Light» (так же может быть «Led display»). Эта функция просто отключает подсветку, если она раздражает, например, ночью. Ни на какие настройки отключение дисплея не влияет и кондиционер продолжает работать в настроенном режиме. Чтобы включить подсветку нужно повторно нажать на кнопку «Light».
- Чтобы активировать функцию самоочистки внутреннего блока на некоторых моделях есть кнопка «Clean» (может быть «Auto clean», «X-fan», «Blow»). Смысл этой функции заключается в том, чтобы просушить детали внутреннего блока от влаги (таким образом предотвратить появление плесени). Работает эта опция после выключения сплит-системы – вентилятор внутреннего блока продолжает вращаться некоторое время (обычно до 20 минут). При активации автоочистки (самоочистки) на дисплее пульта обычно загорается значок похожий на вентилятор. Поэтому очень легко перепутать эту опцию со стандартной регулировкой скорости вентилятора.
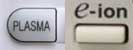
- Чтобы активировать ионизатор или плазменный генератор для некоторых кондиционеров предусмотрена кнопка «Plasma» (может быть «Ion» или что-то подобное). Благодаря этой функции включается в работу дополнительный фильтр, осуществляющий в общем смысле две функции:


- очищает воздух от пыли и микробов;
- обогащает воздух отрицательными ионами.
Осуществляется это благодаря электростатическому полю, создаваемым дополнительным устройством во внутреннем блоке кондиционера. Опция полезная, если она есть на вашей модели, то обязательно пользуйтесь.
- Чтобы настроить поддержание температуры по датчику в пульте, а не по датчику во внутреннем блоке, на некоторых моделях предусмотрена кнопка «I-Feel». Данная опция призвана более точно поддерживать температуру в зоне отдыха человека. Но, по моему мнению, вполне можно настроить комфортную температуру и с традиционным датчиком.
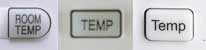
- Чтобы посмотреть текущую температуру в комнате на некоторых пультах предусмотрена кнопка «Temp». При ее нажатии на дисплее пульта или на дисплее внутреннего блока отображается текущая температура в помещении. Через несколько секунд после нажатия на данную кнопку, снова показывается настроенная температура. На некоторых кондиционерах текущая температура может показываться постоянно на внутреннем блоке устройства (отображается автоматически после настройки температуры).

«Скрытые» кнопки на пультах сплит-систем
На некоторых пультах есть «углубленные» кнопки, которые нажимаются тонким предметом. Это обычно кнопки «Reset» – сбрасывает настройки пульта к заводским (обычно к автоматическим). И кнопка «Lock», которая блокирует пульт от случайного нажатия (или, например, от детей). Чтобы разблокировать нужно нажать её повторно.
Последовательность настройки любого кондиционера
- Сначала включаем кондиционер в «сеть»;
- Включаем прибор кнопкой «On/off»;
- Выбираем нужный режим кнопкой «Mode». Ждем 10 минут, и параллельно продолжаем настройку по следующим пунктам;
- Настраиваем нужную температуру кнопками «Temp» или стрелками;
- Если требуется, то настраиваем нужную скорость вращения вентилятора;
- Если требуется, то настраиваем направление потока воздуха регулировками жалюзи «Swing»;
- Если требуется, то активируем дополнительные опции – ионизатор, самоочистка, «i-feel», «sleep», «turbo» и прочие.
P.S. Если в комнате текущая температура соответсвует настроенной, то кондиционер не будет холодить (или греть в зависимости от режима).
Значки и кнопки на внутреннем блоке сплит-системы
 Практически на всех внутренних блоках есть одна «волшебная кнопка», с помощью которой можно включить кондиционер с автоматической настройкой. Обычно она малозаметна – находится под передней крышкой блока на корпусе или на дисплее. Обозначается «auto» или «on/off». Настроить необходимые параметры при помощи этой кнопки нельзя – потребуется пульт, хотя бы универсальный (если утерян штатный). Подробнее об этой скрытой кнопке читайте по ссылке ниже (на статью про включение кондиционера без пульта).
Инструкции по настройке кондиционера в различных режимах
Если вам нужно включить кондиционер в определенном режиме, то на моем сайте уже есть все инструкции:
Рассмотренные в данной статьи кнопки и функции наиболее часто встречаются на пультах, но и попадаются «навороченные» пульты, где тоже есть все те же опции, только обозначены необычно. Примеры: круглые пульты на LG Stylist, так же на пультах Electrolux непонятные обозначения и прочие.
На этом, пожалуй всё… Если статья была для вас полезна, то оставляйте комментарии!
Источник
- Manuals
- Brands
- AERMEC Manuals
ManualsLib has more than 2293 AERMEC manuals
Popular Categories:
![]()
Air Conditioner
Accessories For Chillers & Freezers
Models
Document Type
PGS
Quick Start Manual
Air Compressor
Models
Document Type
ANR R407C
Technical Manual
NRA 0800
Technical Manual
NRA 0800 H
Technical Manual
NRA 0900
Technical Manual
NRA 0900 H
Technical Manual
NRA 1000
Technical Manual
NRA 1000 H
Technical Manual
NRA 1250
Technical Manual
NRA 1250 H
Technical Manual
NRA 1400
Technical Manual
Show all AERMEC Air Compressor manuals
Air Conditioner
Models
Document Type
AN 11
Technical And Installation Booklet
AN 117
Technical And Installation Booklet
AN 16
Technical And Installation Booklet
AN 167
Technical And Installation Booklet
AN 21
Technical And Installation Booklet
AN 3M
Technical And Installation Booklet
AN 4
Technical And Installation Booklet
AN 47
Technical And Installation Booklet
AN 6
Technical And Installation Booklet
AN 67
Technical And Installation Booklet
Show all AERMEC Air Conditioner manuals
Air Conditioner Accessories
Models
Document Type
BC8
Manual
BC9
Manual
GLL10
Installation Manual
GLL20
Installation Manual
Air Handlers
Models
Document Type
T 1
Installation And Maintenance Manual
T 2
Installation And Maintenance Manual
T 3
Installation And Maintenance Manual
T 4
Installation And Maintenance Manual
T 5
Installation And Maintenance Manual
T 6
Installation And Maintenance Manual
T 7
Installation And Maintenance Manual
TS 13
Use And Installation Manual
TS 16
Use And Installation Manual
TS 23
Use And Installation Manual
Show all AERMEC Air Handlers manuals
Boiler
Models
Document Type
S300S
Instructions For Installation, Use And Maintenance Manual
S400S
Instructions For Installation, Use And Maintenance Manual
S500S
Instructions For Installation, Use And Maintenance Manual
Camera Accessories
Models
Document Type
MU
Quick Start Manual
Chiller
Models
Document Type
1251
Technical Installation Manual
1401
Technical Installation Manual
1402
Technical Installation Manual
142
Technical And Installation Booklet
142 E
Technical And Installation Booklet
142 H
Technical And Installation Booklet
1427
Technical And Installation Booklet
1427 E
Technical And Installation Booklet
1427 H
Technical And Installation Booklet
Show all AERMEC Chiller manuals
Chiller Control System
Models
Document Type
GR3
User Manual
Computer Hardware
Models
Document Type
VMF-485LINK
User Manual
• User Manual
Control Panel
Models
Document Type
FMT 10
Use And Installation Manual
FMT 20 AW
Use And Installation Manual
FMT21
Use And Installation Manual
micro chiller 2
Usage Manual
MODUCONTROL
Usage Manual
• Summarized User Manual
• Usage Manual
MULTI CONTROL
Booklet
MVASZC
User & Installation Manual
NBW
Directions For Use Manual
NBW-H
Directions For Use Manual
• Technical And Installation Booklet
NRA
Directions For Use Manual
• Technical And Installation Booklet
• Technical And Installation Booklet
• Manual
Show all AERMEC Control Panel manuals
Control Systems
Models
Document Type
HRC
Accessory Manual
Multichiller
Manual
Control Unit
Models
Document Type
MCR
User Manual
MODUCONTROL
Usage Manual
• Summarized User Manual
• Usage Manual
RTE240
Installation And Maintenance Manual
• User Manual
RTE400
Installation And Maintenance Manual
• User Manual
VCFD 2
Installation Manual
VCFD 3
Installation Manual
VCFD 1
Installation Manual
VCFD 4
Installation Manual
Show all AERMEC Control Unit manuals
Controller
Models
Document Type
anz
Usage Manual
CC2
User & Installation Manual
EXTK PRO
User Manual
HMI-1
User Manual
HMI-BHP
User Manual
Multichiller-Evo
User Manual
NXW
Usage Manual
• Usage Manual
pCO3
User Manual
WMT21
Manual
WRC50
User Manual
Show all AERMEC Controller manuals
Dehumidifier
Models
Document Type
DMH 220
Use, Installation And Maintenance Manual
• Installation Manual
DMH 220C
Use, Installation And Maintenance Manual
• Installation Manual
DMH 360
Use, Installation And Maintenance Manual
• Installation Manual
DMH 360C
Use, Installation And Maintenance Manual
• Installation Manual
DMH Series
Use, Installation And Maintenance Manual
DMK12
User Manual
DMK20
User Manual
DMK24
User Manual
DML 100
Instruction Manual
DML 120
Instruction Manual
Show all AERMEC Dehumidifier manuals
Electric Heater
Models
Document Type
BVR1
Installation Manual
Fan
Models
Document Type
CHU L
Instructions Manual
EUP
Use And Installation Manual
FCA 122
Technical And Installation Booklet
• Directions For Use Manual
• Installation Booklet
FCA 122 R
Technical And Installation Booklet
• Directions For Use Manual
FCA 122 R1
Installation Booklet
FCA 124
Technical And Installation Booklet
• Directions For Use Manual
• Installation Booklet
FCA 124 R
Technical And Installation Booklet
• Directions For Use Manual
FCA 124 R1
Installation Booklet
Show all AERMEC Fan manuals
Heat Pump
Models
Document Type
AN R407C
Technical And Installation Booklet
• Technical And Installation Booklet
ANK 020 H
Installation Manual
ANK 020 HA
Installation Manual
ANK 020 HP
Installation Manual
ANK 020-085 H
Installation Manual
ANK 020-085 HA
Installation Manual
ANK 020-085 HP
Installation Manual
ANK 030
Technical Installation Manual
• Installation Manual
ANK 040 H
Installation Manual
Show all AERMEC Heat Pump manuals
Heat Pump Accessories
Models
Document Type
Omnia UL 11 C
Use And Installation Manual
Omnia UL 16 C
Use And Installation Manual
Omnia UL 26 C
Use And Installation Manual
Omnia UL 36 C
Use And Installation Manual
Heater
Models
Document Type
CLIMAFON 12P
Manual
CLIMAFON 13P
Manual
CLIMAFON 22P
Manual
CLIMAFON 23P
Manual
CLIMAFON 32P
Manual
CLIMAFON 33P
Manual
CLIMAFON 42P
Manual
CLIMAFON 43P
Manual
FCW 21
Technical And Installation Manual
FCW 222V
Installation And User Manual
Show all AERMEC Heater manuals
Heating System
Models
Document Type
Novatherm TRS Series
Manual
Novatherm TRS1001
Manual
Novatherm TRS1301
Manual
Novatherm TRS251
Manual
Novatherm TRS351
Manual
Novatherm TRS501
Manual
Novatherm TRS651
Manual
Novatherm TRS801
Manual
RePuro 100
Installation Manual
• Installation Manual
• Technical Manual
Show all AERMEC Heating System manuals
Household Appliance
Models
Document Type
FCX
Technical Manual
• Directions For Use
• Direction For Use And Installation
Industrial Equipment
Models
Document Type
NRB 0800
Installation And Maintenance Manual
• Installation And Maintenance Manual
NRB 0900
Installation And Maintenance Manual
• Installation And Maintenance Manual
NRB 1000
Installation And Maintenance Manual
• Installation And Maintenance Manual
NRB 1100
Installation And Maintenance Manual
• Installation And Maintenance Manual
NRB 1200
Installation And Maintenance Manual
• Installation And Maintenance Manual
NRB 1400
Installation And Maintenance Manual
• Installation And Maintenance Manual
NRB 1600
Installation And Maintenance Manual
• Installation And Maintenance Manual
NRB 1800
Installation And Maintenance Manual
• Installation And Maintenance Manual
NRB 2000
Installation And Maintenance Manual
• Installation And Maintenance Manual
NRB 2200
Installation And Maintenance Manual
• Installation And Maintenance Manual
Show all AERMEC Industrial Equipment manuals
Inverter
Models
Document Type
FCLI 122
Technical Manual
• Installation Manual
• Technical Manual
• Installation Manual
FCLI 124
Technical Manual
• Installation Manual
• Technical Manual
• Installation Manual
FCLI 32
Technical Manual
• Technical Manual
• Installation Manual
• Technical Manual
• Installation Manual
FCLI 34
Technical Manual
• Technical Manual
• Installation Manual
• Technical Manual
• Installation Manual
FCLI 42
Technical Manual
• Technical Manual
• Installation Manual
• Technical Manual
• Installation Manual
Show all AERMEC Inverter manuals
Measuring Instruments
Models
Document Type
AERWEB300
Installation Manual
Network Router
Models
Document Type
WMT20
User Manual
Power Tool
Models
Document Type
Omnia HL 11 CM
Use And Installation Manual
• Use And Installation Manual
• Technical And Installation Booklet
Protection Device
Models
Document Type
PRGD1
User Manual
PRGDX
User Manual
Recording Equipment
Models
Document Type
AER485
Quick Start Manual
C-TOUCH
User Manual
PCO5
User Manual
• User Manual
• User Manual
• User Manual
• User Manual
• User Manual
• User Manual
PGD1
User Manual
• User Manual
• User Manual
• User Manual
VMF-485LINK
User Manual
• User Manual
VMF-E4X
User Manual
VMF-E6
Manual
VMF-FMD
Accessory Manual
Remote Control
Models
Document Type
EWPE SMART
User Manual
fcl
Directions For Use Manual
• Directions For Use Manual
gll10m
Directions For Use Manual
• Directions For Use Manual
• Installation Booklet
gll10r
Directions For Use Manual
• Directions For Use Manual
• Installation Manual
gll20r
Directions For Use Manual
• Directions For Use Manual
• Installation Manual
INVERTER WLRC
User Manual
REMOTE HANDSET
User Manual
WLRC10
User Manual
WLRC20
User Manual
WLRC30
User Manual
Show all AERMEC Remote Control manuals
Server
Models
Document Type
AER Connect
Accessory Manual
Temperature Controller
Models
Document Type
CXS 1207 H
Technical And Installation
NRL0280E
Installation And Maintenance Manual
NRL0280HE
Installation And Maintenance Manual
NRL0300E
Installation And Maintenance Manual
NRL0300HE
Installation And Maintenance Manual
NRL0330E
Installation And Maintenance Manual
NRL0330HE
Installation And Maintenance Manual
NRL0350E
Installation And Maintenance Manual
NRL0350HE
Installation And Maintenance Manual
NRL0500A
Installation And Maintenance Manual
Show all AERMEC Temperature Controller manuals
Thermostat
Models
Document Type
Omnia UL 16 N
Use And Installation Manual
• Use And Installation Manual
• Use And Installation Manual
Omnia UL 21 N
Use And Installation Manual
Omnia UL 36 N
Use And Installation Manual
• Use And Installation Manual
• Use And Installation Manual
PXA R
Use And Installation Manual
STA
Manual
STH
Manual
VMF-E18
Use And Installation Manual
Touch Panel
Models
Document Type
VMF E6
User Manual
Touch terminals
Models
Document Type
PRD1
Usage Manual
Transducer
Models
Document Type
NRA
Directions For Use Manual
• Technical And Installation Booklet
• Technical And Installation Booklet
• Manual
NRC
Directions For Use Manual
• Manual
TV Mount
Models
Document Type
AMP10
Quick Start Manual
Ventilation Hood
Models
Document Type
VEC
Technical Manual
VES Series
Technical Manual
VES030
Instruction Manual
• Installation Manual
• Technical Manual
VES040
Instruction Manual
• Installation Manual
• Technical Manual
VES130
Instruction Manual
• Installation Manual
• Technical Manual
VES140
Instruction Manual
• Installation Manual
• Technical Manual
VES230
Instruction Manual
• Installation Manual
• Technical Manual
VES240
Instruction Manual
• Installation Manual
• Technical Manual
VES330
Instruction Manual
• Installation Manual
• Technical Manual
VES340
Instruction Manual
• Installation Manual
• Technical Manual
Water Heater
Models
Document Type
SAP 0075
Booklet
• Installation Manual
SAP 0150
Booklet
• Installation Manual
SAP 0300
Booklet
• Installation Manual
SAP 0500
Booklet
• Installation Manual
SAP 0501
Booklet
• Installation Manual
SAP 0750
Booklet
• Installation Manual
SAP 1000
Booklet
• Installation Manual
SAP Series
Installation Manual
Water Pump
Models
Document Type
SAP 1500
Manual
SAP 2500l
Manual
SAP 3500
Manual
Wireless modules
Models
Document Type
WIFIKEY
User Manual
Контактный телефон: (495) 664-23-70
E-mail: , пожалуйста, укажите свой контактный телефон
© 2011 — 2023 splitoff
Цены на сайте не являются публичной офертой и указаны без НДС.
Публикация данных статей, фото, видео материалов на других сайтах, форумах, чатах, блогах, без письменного разрешения авторов сайта запрещена.
Регистрируясь на сайте или ставляя отзыв (комментарий), вы соглашаетесь с политикой конфиденциальности.